Alfa Romeo Forums banner
81 - 100 of 156 Posts
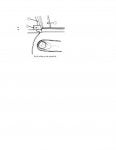
Punching the holes is not terribly difficult with a wood block, 5/16" hole punch, and a mallet.

However, it's a tedious process to locate the hole sites. I draped the softtop at the rear trough as best as possible on center, and located how far up from the fabric bottom seam the holes would need to be to match the metal strip; then used a mark-a-lot broad tip to show that line area. By using a paint marking pen to paint the top of each stud and touching the fabric to the stud, in turn, I was able to punch a hole and then secure that portion of the softtop with a large fender washer and nut on the stud, then move to the next stud adjacent. Don't forget to leave a generous bit of fabric allowance around the large radius at the back corners, or you'll have a wrinkle as the softtop tries to stretch into the bend with the metal strip forcing it into position.

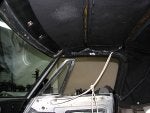
Did I mention this was a tedious project? It took awhile to mark and punch all the stud holes, and then I had to remove the temporary fasteners so that the metal strips, top, and drape fabric were installed. I started securing all with the side strips first, and then the back strip. It is possible to make a "mistake" in locating a hole, but if you are careful and conservative about where you locate and punch the holes, you should have enough material left to re-locate and punch a hole without it showing or becoming a drastic problem with a ruined softtop.

By locating the holes at the furthest down position, I was barely able to have enough "top" material going forward to allow the softop to reach the front windshield and latch the top. I had to leave the car outside in a 85F day with bright sunshine (we're at 6,000' elevation) for several hours and keep re-trying to close the top. On my fourth try, the top finally eased enough to allow me to get the latches started, and then an hour later, I was able to push the front of the softtop down enough to the window frame to allow the latches to close. The top was tighter than a banjo, and a few more hours in the sun only started to ease the tension enough that I could start positioning and gluing into place the window pillar flaps and soft portion.

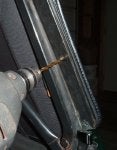
I found that I couldn't trust my dry runs to locate where the metal strip was to be glued into place for the three rivet holes to line up and have the window contact area closely located to the softtop frame. So, I located the metal strips in place on the fabric, lined up the holes, and secured all with some clamps, leaving enough of the fold over material exposed that I was able to glue in a small area to hold the flap. I then glued the back side (folded over portion), and then glued the main surface of the metal. This was a couple more steps than shown in this thread by the OP, but my procedure was rewarded by having the 3 rivet holes all line up on the first try and I was able to set the pop rivets without any difficulty. The edge of the metal strip is snug against the seam of the soft area.

Would I buy this (lower) quality vinyl top again for my next softtop project? No way. The extra money for a better quality top is money well spent when your labor is dear.

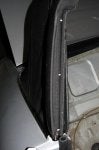
On the top I bought, two of the fixed positon bows do not match where the securing fabric strips are located, so I had to "extend" the fabric a bit with some scrap material.
Also, the panels that seal against the door window openings do not have uniform overlap to the windows, although I believe they will seal adequately ... given that this car is a 3-season car and we don't get a lot of rainstorms, although it's likely that I'll get caught out in a heavy downpour in the mountains a few times a season. While I enjoy driving a roadster, the reality of driving around here is that there's so much airborne particulates ... dust, plant matter, pollens, and dirt ... that my eyes get sandblasted every time I drive around here with the top down and the windows rolled down. So I'll most likely drive this car with the softtop up until I travel out of the area (SE Wyoming) to the Colorado mountains where the particulates aren't so plentiful.
 
Just finished installing a new cloth top on my 91 S4. All went very well until the absolute last step -- attaching the little chrome "edge guides". The guides are attached with a phillips screw which goes through the edge guide, through the top material, and into the top frame (see diagram attached - figure 3 is the edge guide). But the only way to find the hole in the frame is to poke "test holes" through the top material until you find the hole. And, of course, poking all those holes in the top material is going to leave lots of holes in the top material. So, how has anybody gone about locating the screw hole without damaging their top? Grazie.
 

Attachments

This has been a great topic now that I'm finally getting the top on my 78. I've gone through all the issues in the book, no t-bolts, missing the weather channel, half the studs were missing. One of the last things I'm having difficulty with is threading the wires that pull over the window. I've got them threaded through the top (of the top), but I can't figure out were they go into the car and down to the turnbuckles (speaking of witch, mine are shot). There is no precut hole either, I'm worried that after I figure out were this hole should be, cutting one in would cause a tear when the material is taught. Any advice on the subject would be greatly apreciated.
 
Project Finished!

After reading this great detailed thread I decided to also go with the EZ-ON top from topsonline.
I have to say, it was really not a difficult task, just a test of organization and patience.
The end result is absolutely beautiful - a straight top with no creases and tight all around.
Thanks for pointing out a real good deal at great price, the top was ~$220 including shipping, so the whole project with glue, rivets, buying an awl, smaller odds and ends was less than $250 and I am extremely pleased with the result.

The holes that were already in the top in the rear did fit well and I appreciated the fact I did not have to cut the wholes.

So if you are not dead sold on a canvas top this is a real good choice.
 
I already did a convertibel top install (without any knowledge, just following the manual that came with the hood) so I know how it goes, but it's STILL scary to look at all these pictures. I dread the days when I'll have to do that all over again. (It isn't particularly difficoult, but there are oh so many opportunities to slip up.)
 
I used "Weldwood Nonflamable Contact Cement, Neoprene Rubber Formula". Very satisfactory results for installing a Spider top last Fall. It's fairly watery and when you apply it and looks like it wouldn't stick a stamp to an envelope. But follow the directions and it does work very well. No odor, either.
 
I thought I was close to being finished with a '77 Spider Stayfast top installation. I have both ends - the header and the rear section attached - though not the sides or the final gluing of the bow material.

However, I'm at least three inches away from being able to attach the header latches. I thought it was rather clever in that I attached a rope around the top frame from where it curves around the window, then to the bracket on the passenger door where the grab handle fits in. By pulling on the door it moves the top closer, but it's still at least an inch away for the arm to even begin going into the female part of the latch.

My fear is that even if I could manage it, I might well break the windshield. I'm a one man band so I can only do one side at a time. This is my first square back top installation, though I've installed several tops on '69 Spiders. They were always extremely tight, but I managed to get them latched.

The car is inside the shop on stands and it will be at least a couple of weeks until I can move it outside - in case leaving it in the sun is the only solution.

Does water help stretch it? Heat gun? Magic? If the latter, want to share?

Very frustrated.

I'll add there is no T gizmo for this top, should it matter.

Biba
 
I hadn't realized the rope had slipped forward at the rear, but I managed to get the latches latched. Today I loosened the nuts on the rear bracket, squirted water on the underside (that's the reflection you see, not dust) and was just barely able to attach the latches - one at a time. Also a rope on the other side. With my knee holding the door open as far as I could get it, one hand pushed down, and the other pushed on the latch. I'll leave it for now, at least until the water dries.

You'll also note reflections around each of the hinge points of the frame. While I should have done it prior to installing the top, I squirted (with tube) LPS Industrial Strength Lubricant #2. I held a doubled paper towel behind each when squirting, waited a bit each time for the (20) hinge points to drip down, then wiped them off. I'll go back and clean them better now. This stuff is tremendous. It was either made for the aircraft industry or is extensively used by them. I use it for everything - tach/speedo cables, inside door openers/latches, trunk/hood latches, etc. WD-40 doesn't remotely compare to it since this stuff doesn't dry out, nor does it attract dirt like most lubricants do. The top goes up and down considerably easier now.

Biba
 

Attachments

Next we put the carpet back. I first tightened the bolts that hold the top to the back, finally one last time with the top latched.

View attachment 63834

I also cleaned up the hardware( as best as I could), that goes through the carpet above the package tray. The little twist things are for the toneau cover and the wider bar is for the top hold down straps( one missing still looking). The crome pieces are the caps for the tops of the doors.
View attachment 63835

First position the carpet inside.

View attachment 63836


I fed the screws through the carpet and into the gromets in the back metal strip (under the carpet) first, then pushed them through the vinyl strip on the back of my carpet.
View attachment 63837

Then lined everything up, have to lift the parcel shelfand put the bottom of the carpet under it. When it's lined up start along door strip, then go accross the top back of the carpet screwing it into the body

View attachment 63838
Question about the Wider Bar you mentioned, can you show me where this is located on the car and what goes between the wider bar and the top? Was this Wider Bars also used on 1974 Spider?

Thanks for sharing this great info.

Rich
 
Just finished installing a new cloth top on my 91 S4. All went very well until the absolute last step -- attaching the little chrome "edge guides". The guides are attached with a phillips screw which goes through the edge guide, through the top material, and into the top frame (see diagram attached - figure 3 is the edge guide). But the only way to find the hole in the frame is to poke "test holes" through the top material until you find the hole. And, of course, poking all those holes in the top material is going to leave lots of holes in the top material. So, how has anybody gone about locating the screw hole without damaging their top? Grazie.
Place item 3 in place then poke the hole, and I am sure you wont miss.
 
'77 Spider top side brackets

I'm really torn here. Is this the way the outer side flap is to go? Or should the pop rivets be removed and it goes on the other side? The inner vertical piece on the frame has a rounded edge that the material with the three hole metal piece wraped around it fits into very nicely - but the back side of teh rivets look terrible (though if this is the correct way, I'll paint them black). My thinking is why else would the top frame have this U-shape if wasn't meant to be utilized?

However, drill out the rivets, and move it around to the other side and it would look much nicer and the backside of the rivets wouldn't show.

My top is capable of being latched but the right side in particular still needs tons of energy to latch it. My point is I don't know if the top folds down better if it is attached on one side or the other.

Comments?

Biba
 

Attachments

Biba - That's incorrect. The rivets will not show when installed correctly. Check the manual again. It shows how to fold it in. The metal backer bar is slipped in behind the flap material so that the bead sits up against the slight "U" of the top frame. The excess flap material is folded around and glued to the backer bar (at least that's what I did with mine). That way there will never be any slippage. Also, the rivets you're using are way too long. They should just be long enough to get through the top frame, the three thicknesses of flap and the backer bar and still hold tight. Since the window is going to press slightly against the foam backed

With regards to the tight fit . . . . you have loosened the bolts holding the top frame to the body and let the frame move down, right. Once latched you can then move the frame up till it's snug, then unlatch the top and again move the frame slightly up and try a latch up again. When latched it should bring the top material tight, but should not require more force than a moderate sized lady could exert.

This is not a great picture, but you get the idea.
 

Attachments

This a heads-up for top installers to NOT overtighten the 22 rear stud nuts. Overtightening will create a "dimple(s)" in the outer panel. Don't ask me how i know.
 
I would suggest that you soak them for as long as possible with penetrating oil before attempting to turn them. If any or all break off, the only way I know of is to drill them out and put in stud nuts. This requires a bit of the proper size and a setting tool which you may be able to rent. Very tedious time consuming work so try to save as many studs as you can. The nuts should all be replaced and replace the metal strips as well if they are rusted signifantly. This was the worst part of the job, I guess because so little progress for so much time invested.
 
These are great threads on top replacement. I replacing the top on my '81 with one from a donor car, frame and all, so the worst of it is done. Is there any reason not to use sheet metal or self tapping screws to replace the broken studs along the rain channel? I'm not a purist, so I don't need to have studs and nuts.
 
Besides leaving a path allbeit a small one for moisture to enter I suppose that could work. I'm not sure how tight you could get a self tapping screw in before it strips out which would allow the top to pull out and possibly cause a wrinkle.
 
an old trick for rusty nut bolts... use what ever you want to oil then with penertrating oil brake fluid..etc... let sock for a few hours.... DO NOT loosin the bolt/nut.. instead tighin' the bolt/nut a wee bit. this will brake the grip of any leftover rust.. then use a small wire tooth brush.. a quick run arounf the stud( in this case) add a drop of oil,, then loosin the nut off the stud..
 
an old trick for rusty nut bolts... use what ever you want to oil then with penertrating oil brake fluid..etc... let sock for a few hours.... DO NOT loosin the bolt/nut.. instead tighin' the bolt/nut a wee bit. this will brake the grip of any leftover rust.. then use a small wire tooth brush.. a quick run arounf the stud( in this case) add a drop of oil,, then loosin the nut off the stud..
All of the above, except brake fluid. To add, what i usually do is find a nut of the same size, cut one end of it so it looks like a C and screw it in and out using oil, the little cut that you did is enough to clean/scrap any rust/paint of the bolt. First screw it in with your fingers a few turns, then use the socket.
 
81 - 100 of 156 Posts