Alfa Romeo Forums banner
61 - 80 of 156 Posts
Discussion starter · #62 ·
sorry for delay

John
Thanks for the reminder( hope this comes out doing it from my Blackberry)I just need to do the cables and the turnbuckles then I will post final pictures. I got busy at work, but the top looks good.should get to this at the weekend stay tuned thanks for your patience
 
I thought I would chime in on this thread as I got brave enough to take this on by myself because of your pictures and comments.

The top was easy to remove with a knife. I managed to get all of the old nuts and washers off the retaining bars at the back of the body with out breaking any. I followed that up with a die on the tread and before installing the washers and nuts again, a light coating of antiseize. Be careful when removing the washers and nuts as they have a tendency to roll down the channel and fall into the large drain pipe. (sounds like a Plinko game when it does).
I drilled out the rivets easy enough. The hard part was wrapping the fabric around the side bars and installing the new rivets. This part was made easy with a nail to locate the holes and then lightly running a Dremel drill through to make room for the rivets. Came out perfect.

I bought my Hartz cloth top off of Ebay. It is called an Easy-top from Georgia. The top does not have the holes for the cables to run through. I looked and looked for holes, thought about making holes, then realized the top was modified. The cables run outside of the material, and go inside through a grommet. From there it goes inside the channel to the tensioners. I didn't have a problem threading the cables into the metal, but fishing the ends out proved to be a bit of a challenge. Some thin needle nose pliers resolved that issue. The top is installed and curing over night before I put tension on the top when I fasten it in place.
How do you adjust the tension of the tensioners? Is there a procedure?

The T-bolt doesn't exist on my soft top. There is a hole for what appears to be a small pop rivet to thread through. [URL="http://i159.photobucket.com/albums/t145/alfadoctor/DSC_0001_edited.jpg[/URL]
What I might consider is putting a nice stainless screw and upholstery grommet (like on the lower door panel) to give it a nice finish. The lower front corner chrome metal needs to be polished and new screws put in.

Tomorrow I will finish off the top by clamping the front down and gluing the bars and the other small items mentioned.
The top is very tight, tighter than I imagined. Not sure about the rear window yet if it will come out straight or have waves in it. Any one know of how to fix this? Might have to take to a restoration shop near by where I work and have them put their expertise to work if it doesn't resolve itself.

Thanks for the help. Now that I have done one, the next one is alot easier. :)
 
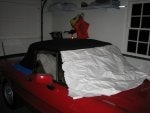
The top is in the final stages of finish work. I punched a hole where the T-bolt is to go and installed a 4mm bolt with washers on both sides of the fabric and put that through the hole in the frame, then secured it with a nut. I am going to have to work on alignment for the end as there seems to be a gap as it hangs down to low. The cables I just made tight and that seems to be sufficient.
I ordered a new rubber for the top front bow. In trying to install the rubber in the channel with liberal amounts of Sil-Glyde, I gave up in frustration after only being able to get about 6 inches into the channel. My thought was the channel was to rusted to move the rubber through, so I ordered a new channel. My next thought was to install the rubber in the channel before installing it on the top and then shifting the rubber back and forth to pop rivet the part to the top.
Well, I got to looking at the rubber part I had and figured out that the width of the base that slides in the channel is about a .5 mm to wide. Hence, the rubber binds going into the channel and therefore you can only get about a foot maximum before it binds all together. I tried silcone spray, 303, sil-glyde, white grease and liberal amounts of elbow grease to get the new rubber to go into the new channel.
As I was mulling how to either shave a hairs width off the sides of the rubber, it was then I remembered I got a peice of odd looking rubber with the car in all the parts. I fished for it and turns out to be a different type of rubber than the one I just bought, but it a top rubber seal. So, I lubed up the rubber and it slid right into the channel with alot less effort, albeit it still was hard getting it to move.
The replacement rubber is to wide. Putting my metric calipers to the base the old rubber was 16.9mm wide. The new rubber I just bought was 17.9mm. Ah, I was close, it is .5mm wider on each side, hence it won't slide in the channel, no matter how much grease I put on it. The inside of the channel as best I can measure is 18.7mm. The difference between the new rubber and channel is .5mm (or .25mm on each side) making a very tight fit. The difference in the old rubber and the new channel is 1.5mm (.75mm each side) thereby making it easier to pull through.
Lets say it has been an interesting afternoon. :)
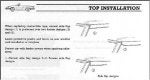
Now to install the top rubber tomorrow and finish off this top.
Wife says it looks beautiful.
 
Christopher,

Is it possible to thread a wire/string down the channel and _pull_ the rubber seal through it? This would stretch the rubber and make it narrower. When pushing it through the channel, it would grow wider from the compression. Sort of like an inverted Chinese finger puzzle.

Michael
 
I thought about some way to make the seal narrower but ran out of ideas. If it was stretched taller then the foot print of the base would be small and slide through. Seems logical but making something to work, is beyond my expertise. So, I called my source where I got both the rubber and new channel. I was told that they would check to see why the aftermarket rubber doesn't fit. I imagine they will try the rubber in the new channel and come up with the same conclusion I have. If they can get it slide in I want to know how they did it. :)
The factory rubber is discontinued which would have the smaller footprint. So you have to go with the aftermarket, but if it doesnt' fit, what are you going to do? *shrug*
 
Which of the photos above shows this process of which you speak? I have this image in my head of you pushing a rubber strip into a channel and having it squeeze out to a larger diameter and get stuck (reverse finger puzzle style). It would seem that with a piece of string tied to a wall or pulled by another party, you might be able to tease the thing into the channel. Your measurements indicate it should fit. Just trying to understand and maybe help. I'll have at least one, probably two top replacements this summer/fall. I really appreciate this thread by our Flying Scotsman friend, gadwhite.
 
Putting the gasket in the channel out of the car would be one thing, but then to put the gasket in the channel after it is riveted to the top would be something all together different. Maybe putting some safety wire with some vice grips while someone feeds it in to the channel might work. I went by Napa and picked up a new tube of Sil-Glyde as my 10 year old tube was finally used up. :) I asked for some Elbow grease but they said they just sold the last tube. :p
 
Apply RaggTopp Protectant when done . . .

Don't forget to apply protectant when done. This will keep the water beading up on your brand new top. I just applied some today to mine.

I masked off my car with newsprint paper (actually it was packing paper from IAP from my last order of new pedal covers, a license plate frame, and a serpent key chain) and blue painter's tape. For the front windshield all I did was capture the paper between the window and the top. The paper keeps the protectant from getting on your paint, windshield, and rear window.

My top is not new, but I apply this every year and it keeps it looking and lasting great.
 

Attachments

Convertible top installation

Hi, Thanks for the great info on securing the top to the pillars. One question though. How do you mount the metal clips at the bottom of the pillar on the outside of the top to prevent abbrasion? Please advise. Thanks, Bob
 
top innsall

I found that using clamps across thoe bow will help to keep the bead lined up correctly and not pull back when you go put the top up. The fabtic on the bow is going to want to pull up with that first full stretch of the fabric when you put the top up. I was not even able to latch the top on the first try. I had to let it sit for a day and then it was do-able but just barely. It now works and stretches great and latches with a tight snug. I used the cloth top from IAP with the padded panels. I also found the rivieting of the side bars a nightmare to get revited correctly.

pjn
 
I'm doing the softtop replacement on my '78 now, and found a couple of ways seemed to work best for the removal and "clean up" phase ....

I just cut away as much of the old softtop as possible with a pair of shears. It made access to the nuts and riveted areas much easier. The top was "off" in a matter of minutes, and I had ready access to apply penetrating oil (PB Blaster) to the nuts instead of crawling around in the confines of the back shelf area.

I used Xylene for the solvent to remove the old glue; it's a stronger and slower evaporating solvent than Acetone, so it works more aggressively on the old glue. By wrapping a couple of shop rags around the bows and keeping them soaked with solvent for a few minutes, the glue came off pretty freely. Of course, you must do this outside and be careful about any possible source of combustion. I set a couple of old shipper's blankets across the cabin area and sat on the back deck with the bows in my lap for easy access.

A nylon spiked stripper disc in my die grinder made quick work of clearing the old glue off the bows, the side pieces, and the front and rear retainer strips. What little that didn't remove was quickly removed with a wire detail brush (Harbor Freight) ... about 4" long in the brush area by about 1/2" wide.

In clearing out all the old glue, I discovered that the last softtop installer had scraped the bow painted surfaces and taken off a lot of the paint. Rather than risk rusting in this area, I sprayed a light coat of Rustoleum Black enamel paint on and left it to dry overnight.

I chased all the studs with a die to clear out all the rust ... which was quite a bit on each, considering that they're just little 5.0 x .8 studs. Vacuumed out the trough, cleared the drain holes, and vacuumed out the back of the car.

So far, the removal and clean up phase has taken only a couple of hours and I'm ready to install the top in the AM. Thanks to the OP for the detailed pix of the job; much better instructions than those supplied with the softtop ... where the manufacturer suggests that only an experienced tech should tackle the work.
 
Soft top questions

I bought my new top from Worlduph and it comes without pocket for the t-bolt and holes for the 22 bolts. The design is also of a older kind (nr 2) with side flaps that dont go all the way to the windscreen. :confused:

But the real question is:
How can i tell were to fasten the 22 bolt without holes? The material will streach and to make a good snug fit you prolly need to now the "stretchness" of the material. Or is the top designed so that the end of the top is to go directly under the retaining strip at the back (22 bolts). Soory I dont know the correct sewing lingo. :confused:

See picture of flap design.
 

Attachments

Swedenspider ...

I, too, purchased a softtop that didn't have any of the holes in the back/side area. According to the instructions that came with the top, they suggest aligning the bottom edge of the top fabric at the bottom of the drip trough that the top is bolted in at, locating the studs, marking the fabric, and then punching holes (with a hole punch) at the marked locations.
 
This is a project that I have been putting off for a long time. Any tops to stay away from? Does anyone have a list of the tops that come with the 22 rear holes already punched? Also for anyone that had to punch them out, how hard is it to get them in the right locations? It doesn't look like you get a second chance if you make a mistake.

Dick Stachowiak
71 GTV
71 Spider
 
61 - 80 of 156 Posts