BURMAN STEERING BOX REBUILD PROCEDURE
Here is my procedure for rebuilding the Burman steering box.
Tools:
Notes:
Read this procedure all the way through before doing anything. Seriously, this is not a difficult procedure but it does require some technique and a plan. Nothing is more frustrating than holding your various parts and realizing that you either need a third arm, a helper, or hold something in your teeth...
Everything needs to be clean.
Everything needs to be clean. Everything needs to be clean.
Did I mention EVERYTHING NEEDS TO BE CLEAN!!!
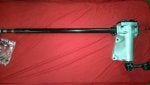
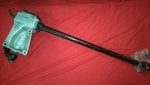
Verify that you have everything shown in the picture below:
![]()
New items:
You will need at a minimum, (54) new ball bearing balls (standard 9/32" or 7.14mm ), new O-ring seal, and new gaskets (make your own) for the upper plate, lower plate, main cover and oval cover.
Inspection:
Carefully inspect the main nut tube to be sure the tube is not crushed or deformed in any way. Run balls through it to make sure they move freely. Inspect the Helicoil for chips or pitting from rust. Likewise, inspect the large (upper) and small (lower) bearing races for defects. Anything that you can feel with your fingernail will be a problem. You may be able to polish the surface but your best bet is probably to locate replacement parts.
I have found that if you open your box up and water comes pouring out – you will probably need new internals…
Finally, inspect the case to make sure there are no cracks. They mostly occur around the bolt holes around the bearing holes. Small cracks can be welded or JB welded. If the box comes apart in pieces… it's time to find a new box. They do sell new boxes but they are pretty pricey. Some day they will be the only option…
Main Nut assembly
![]()
Grease the main nut with heavy-duty grease. Make sure that grease is in the tube as well as the Helicoil race.
Carefully fill the Helicoil with 31 ball-bearing balls. Push them through the tube until they come out the other end. With all the balls in place, there will be a gap of less than one ball’s diameter – this is normal.
![]()
When complete, apply another healthy layer of grease so everything stays in place. Cover and set aside.
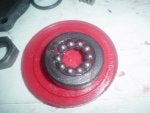
Lower Bearing Assembly:
Locate the lower bearing race – it is the smaller of the two round bearings.
Load it up with heavy-duty grease.
Fill the race with 10 ball bearings. There will be a gap – that is normal.
![]()
Apply another layer of grease over the top of the balls it helps keep everything in place. Cover and set aside.
Here is my procedure for rebuilding the Burman steering box.
Tools:
- A 13mm socket wrench for all the screws.
- A 13mm box wrench for the two nuts on the side cover.
- A clean work area.
- A vise.
- A box of latex gloves (do not use cotton gloves or anything that could leave particles behind).
- Clean shop rags.
- Mineral Spirits and/or Lacquer thinner to clean the parts.
- Plastic bowls to organize the parts in logical order.
Notes:
Read this procedure all the way through before doing anything. Seriously, this is not a difficult procedure but it does require some technique and a plan. Nothing is more frustrating than holding your various parts and realizing that you either need a third arm, a helper, or hold something in your teeth...
Everything needs to be clean.
Everything needs to be clean. Everything needs to be clean.
Did I mention EVERYTHING NEEDS TO BE CLEAN!!!
Verify that you have everything shown in the picture below:
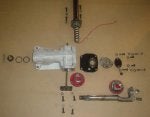
New items:
You will need at a minimum, (54) new ball bearing balls (standard 9/32" or 7.14mm ), new O-ring seal, and new gaskets (make your own) for the upper plate, lower plate, main cover and oval cover.
Inspection:
Carefully inspect the main nut tube to be sure the tube is not crushed or deformed in any way. Run balls through it to make sure they move freely. Inspect the Helicoil for chips or pitting from rust. Likewise, inspect the large (upper) and small (lower) bearing races for defects. Anything that you can feel with your fingernail will be a problem. You may be able to polish the surface but your best bet is probably to locate replacement parts.
I have found that if you open your box up and water comes pouring out – you will probably need new internals…
Finally, inspect the case to make sure there are no cracks. They mostly occur around the bolt holes around the bearing holes. Small cracks can be welded or JB welded. If the box comes apart in pieces… it's time to find a new box. They do sell new boxes but they are pretty pricey. Some day they will be the only option…
Main Nut assembly

Grease the main nut with heavy-duty grease. Make sure that grease is in the tube as well as the Helicoil race.
Carefully fill the Helicoil with 31 ball-bearing balls. Push them through the tube until they come out the other end. With all the balls in place, there will be a gap of less than one ball’s diameter – this is normal.

When complete, apply another healthy layer of grease so everything stays in place. Cover and set aside.
Lower Bearing Assembly:
Locate the lower bearing race – it is the smaller of the two round bearings.
Load it up with heavy-duty grease.
Fill the race with 10 ball bearings. There will be a gap – that is normal.
Apply another layer of grease over the top of the balls it helps keep everything in place. Cover and set aside.