Alfa Romeo Forums banner

Bare Metal Rebuild Phase III: Reassembly

102K views 425 replies 42 participants last post by  r-mm  
#1 ·
Well its been three and a half years since I started Phase II of my bare metal rebuild and I'm finally at the stage I spent long hours in a dirty garage thinking about: reassembly. The milestone seemed to warrant a new thread. BIG THANKS to everyone who helped me along the way with advice, parts and enthusiasm. All appreciated equally!

I'm going to post my progress and many many questions here. I took tons of pictures at each phase but naturally there are always things I missed so let's get right down to it:

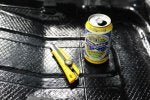
Any tips on routing the trunk latch cable? From the pull does it go between the wheel arch and inner wing as shown?


In the trunk which direction does it take and does it pass under the sheet metal supports at the latch?


A few glamour shots... amazing how it starts to look like a car.


And something you never think of: nice to have a color that looks good with the brake lights! Incidentally - one of many parts I'm missing is the D/S tail light - holler if you have one.
 
#6 · (Edited)
Sorry for not being able to answer your holes question, my 1600 Junior 1975 Unificato (same shell) doesnt have these holes or at least i wasnt able to spot them.

Well what i wanted to ask is whether you could post a picture when you have the carpets in - im not sure whether i should be keeping my old ones now that I may see yours!

Thanks!
Alessandro
 
#8 ·
Thanks Pete (for the info and compliment).

A little progress update:
I'm always trying to be more methodical, picking a task (say, seal fitment) and sticking with it until it's done, but I've started to accept my bounce-around methodology. Touching everything once is a good way to remind myself of various fitment issues or missing parts I may not have had on my radar. Still, I'm following a generally back-to-front progression and have spent a lot of time on the trunk.

I refinished my gas tank inside and out with POR products (this was, oh, maybe 3 years ago ha). I had also purchased some butyl tape and closed cell foam to use as the perimeter seal. After test fitting the gas tank and installing new speednuts, I installed the seals. Butyl first, followed by closed cell self adhesive foam. Without the tank to retain the foam, it naturally wants to lift as it goes around corners, but I think I'll be able to keep it flat long enough to get the tank in.


Before I get the tank in I need to metal work the flange to be flatter than it is (not very) and cut the filler neck down some.


For the same 3 years I've also had a roll of McMaster-Carr sound and vibration deadening and double foil faced thermal barrier on my shelf. I suppose my thinking many years back was to re-create the performance of name brand thermo-coustic products in two layers. I suppose being an architect something about separating the performance for a floor assembly into constituient parts appeals to me. I started installing the dampener on the rear of the trans tunnel, this being a place with relatively simple curvature.

I believe this it the deadener: McMaster-Carr
When it comes to the firewall I'll probably switch to the alum faced product which is rated at a higher temp: McMaster-Carr
This is the double foil faced insulation: Amazon.com: ESP Low-E® EZ-Cool Car Insulation Kit(Includes 100 Sq. Ft Insulation, 25' Foil Tape): Heat and Sound Automotive Insulation For Your Car Restoration Projects: Automotive

Prior to having the car blasted I had it installed on the underside of the roof, it stayed in place beautifully with 3M spray adhesives applied to both metal and insulation.

The first layer - it conforms nicely to the e-brake contours, but asking it to follow the recesses in the sheet metal is more than it can handle. So far I don't believe strict adherence to these contours will impede anything - i believe them to be for drainage and strengthening not recesses for clearance.


The foil faced layer is just a loose test fit for now, as is the dampener on the floor.


I'm uncertain how to conceptualize the floors. The membrane is not and was never intended to operate like a flat roof, protecting the metal underneath. The factory version trapped water in the jute layer, so mine is already an improvement over that. I suppose the big question is how removable this wants to be for the purpose of emergency drainage. The product that Re-Originals sells (and Rossano used) seems to bond more entirely to the floor, leaving not space for water under it. Although my product bonds well, there is no way I can say for sure it wouldn't let water wick under it. So the fear is water gets in, then gets trapped under my vibration damper where I can't see it. I could just "tack" it down with a lite application of adhesive but then I have doubts it'll perform well as a damper. Am I over thinking it?

And a beauty shot.

 
#9 · (Edited)
After revisiting Rossano's thread and looking at what's available I'm leaning to the more original bitumen style sound deadening. It seems 3M makes a very similar product, texture included. I would still use the foil faced foam on top.

See our Scotchgard? Paint Protection Film products: 3M? Sound Deadening Pads 08840, 500 mm x 500 mm, 10 per case

These guys have the pads at a great price - $55 a case of ten. They were also very nice to speak to on the phone, so I took the plunge.

http://www.toolrage.com/prodview.asp?sku=3M-8840
 
#10 ·
For optimum resonance damping, the word is that a close/tight/full-contact/glued/stuck to the metal is required. 100% coverage is not, but it is convenient to obtain something of a water resistant layer in the floor wells. Aluminium tape (the sort used for joining insulation material) on joins and around the edges should give additional protection against water seepage. After an unnoticed incident with spilled water it just sat on top of the Resomat I used for some days with no apparent seepage.
 
#13 · (Edited)
Boy that sure looks like the same product I got from Re-o....good find there. As for overthinking things.....we can all be accused of this at one time or another....in my case I was looking to replicate the original look and fit..this product seemed the closest.

...here's how it all looked on mine....prior to paint...

 
#14 ·
I've used basic insulation, ducting and roofing products from your local building supply store. Very inexpensive and very effective. I've also used the Lizardskin products. A bit of a pain to apply, and I'm sure that it is not as effective as the standard dynamat type products.
 
#15 ·
if you use too thick insulation you will get into trouble fitting stuff like the center console. Also , carefully cut the holes for seatbelts etc. Or you will never find them.
So be careful out there.
Carpets will be a bugger to fit nice. Check out the stop bolt for the gas pedal too. But I would fit the headlining first, so everything stays clean and nice as you will be in and out the car dozens of times.
Then fit the heater. Then fit the sound deadening and the carpet. Seat belts. Wiring loom is simple, there isn't much. Then the dash. Center console etc. Seats very last.
 
#16 ·
Thanks for the sequence advice and reminders Berlinista.

I am confident the 3M + 1/4in foil faced foam will stay under the 1/2"+ that the original bitumen & jute was. Here's a pic from when it came out of the car (good riddance).

I think I'm going to get the bitumen down - partially to protect the floors so I don't scratch them during reassembly - poke thru all the bolt holts, then wait on the foil faced foam. I'll likely cover the bit with cardboard and do the headliner etc.
 

Attachments

#17 ·
Received the 3M sound deadening. Looks nice. Surprisingly made in France. Cuts easily and adheres very well. Even in my somewhat chilly garage, it doesn't really need a heat gun to conform to the compound curves of the body. A little heat helps but too much can craze the plastic top layer (which 3M says to remove if painting over).

I was able to get most of the floors done in about 3 hours.

One thing to note - the pads are perforated down the centerline so it really makes sense to use them @ half their nominal size.
 

Attachments

#19 ·
Yup. Only difference is that the sheets are a bit smaller than the factory stuff so there are more joints. From what I've read, incomplete coverage is not at all a problem for sound deadening - I'm more concerned with standing water. I realize this layer is not acting like a roof but I think I'll tape over the seams to give myself some reassurance that any water that finds its way down doesn't end up in a small crack where it can't dry. Not sure what type of tape to use yet - might use the butyl I bought for the gas tank seal.
 
#21 ·
Are you planning on using this as a storm chaser?:wink2: What are the chances this car will see any rain, ever? :wink2::wink2:

My suggestion is to slit any areas that might have bridged and lay another piece over the slit. As you pointed out earlier, this is a vast improvement of the water entrapping jute.

BTW, the car looks stunning - congratulations!
 
#20 ·
#22 ·
Point taken Rich!

For the record: a 10 pack of the 3M product is just about perfect to do the cabin the way the factory did it - ie nothing on the rear seats and nothing behind the map pockets. If you want to go bonkers or will be doing the trunk I'd suggest ordering more.

Does anyone have a picture of what the factory fuel tank seal looks like installed?

Curious if it overhangs the flange or is tight to it? Its not a C shape is it?
 
#25 ·
Does anyone have a picture of what the factory fuel tank seal looks like installed?

Curious if it overhangs the flange or is tight to it? Its not a C shape is it?
I'm assuming you're asking about the gasket that fits around the perimeter of the fuel tank where it meets the body. I just pulled the gas tank from my 72; the gasket was gray -- similar to foam weatherstrip that you would install in a residential door frame. It was maybe 1" wide and 1/4" thick. Not "C" shaped; just sits under the tank flange. Not sure if you could see it from underside; if so, maybe just a bit here and there.

There's also caulking inside the trunk and on top of the area where the tank flange meets the inside of the trunk.

Caveat -- I just pulled the gas tank out of my 72. No evidence that it had been removed before, but you never know.

If you need pictures of the gasket and/or measurements, let me know. I think I saved some of it for reference.

Scott
 
#23 · (Edited)
Happy New Year all!

In between setting up my new garage and celebrating the holidays I've done a few GTV tasks.

The interior is now mostly covered in sound deadening and the heater is back in. I refurbished the heater, cleaning up the considerable gunk inside it, bench testing the motor and dry lubricating the pivot points. I have a new molded hose (left side) on order and will simply buy metric hose for the right side which doesn't seem to have any tricky bends.


While working on the now quite tidy interior the stalk switch really stood out. Why I left it installed for five years to collect dust is not entirely clear, but luckily pulling it and cleaning it up was not too hard. I did have to consult the owners manual to learn its ways (two position rotation huh) but found the correct continuity in all positions. I replaced the terminals on the harness end but left them as-found on the stalk end as they were well protected by heatshrink and visibly not a standard size.

I'm usually opposed (on grounds of authenticity?) to metallic spray paint, but a few coats did the trick on the stalk switch.

Note to those doing this: the little spring that goes around the steering column is clocked so to speak and can be installed incorrectly so the switch cancels in the wrong direction.


#24 ·
Looking good. I just rewired my stalk to remove some prior hacking in the way of crimp connectors. It looked like at some point in the past someone had cut it out rather than unplug it!? I soldered everything and used heat shrink.
How the signal works I learned from a fellow BB member (Antonio 105) who let me take his 2000 for a spin. I had no idea you could twist it! I expect there will be more learning ahead.
I may follow your lead and paint the metal as it is probably likes yours was..pitted.

Inspiring to see another making progress.
 
#28 ·
Scott - yes a picture would be great, it'd be interesting to see if anyone else has seen that caulk. It would be surprising to me if it were original, but who knows.

After my success with the column stalk I tried to make the gauges look a bit better. Opening them up was quite easy and let me do some dusting. I found a number of threads on improving the lighting of earlier style gauges (which I look at longingly) but not much on the little modules we have on the back of the 2000 Jaeger gauge cluster. Does anyone know what these are called and if warm LED replacements are out there?


#31 ·
Hello RMM I don't have a thread on mine Im going by this wonderful alfa forum and threads by you and daveydog ,nothin to be embarrassed its guys like you that inspire others,Im also installing same 3MM floor deadener that you used,r you using insulation on top of 3MM deadener? sorry for all the questions Im trying to get as much info as I can,by the way your thread on headliner removal is very informative,and Im glad I took mine out the underneath was in horrible shape,I was going to use vinyl paint just to make it look good but after seeing your thread it gave me the motivation to replace it.sorry for all the rambling .again thanks