GIULIA SUPER DOOR FELT / SIDE GLASS WIPER REPLACEMENT
I recently replaced the door felts / glass wipers on all 4 doors of my 69 Giulia Super. These felts have a limited life as you know and when the felt is gone there remains a rusty support stapled with wire to the stainless steel (SS) trim.
First you have to remove the SS trim and old felt by pulling out of door. The original felts were hand stapled (judging by the randomness of the staple placement) to the trim with hardened steel staples that were able to perforate the SS trim. These hardened rusted staples were not easy to remove but they were bent back and pulled out. I saved them in case I decided to zinc plate and reuse. One or 2 SS trim pieces were from an earlier door and had used a different sized staple but were in better condition than those original to the Super.
I then cleaned the SS trim, drilled the staple holes to 0.062 inches, de-burred the holes and buff/polished them with a buffing wheel.
For the front window where the felt is shorter because of the vent window I had 4 NOS felts to use and for the longer rear door I bought 4 from Classic Alfa. The NOS were the exact length, the repros needed to have their ends cut square and then be cut to length.
I then clamped the felt to the SS trim and drilled matching holes where the staples had been. In the case of the NOS felts they laid nice and flat and straight on the SS trim and I was able to drill all holes at once. Not so with the slightly curved Repro felts. The repro felts had an aluminium channel at the bottom, the NOS not.
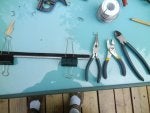
I decided to use 0.050 inch 304 Stainless Steel locking wire to replace the rusted staples. The 304 was very easily bent and corrected. I thought I might have to make a tool or jig to mass produce the SS staples but found that by eye I could often get them to go right in. Tools I used were small clamps, needle nose pliers, small pliers and side cutters.
I bent the staples, corrected the legs of staple with side cutters, pushed the staple through, tipped the legs in with the needle nose pliers and flattened them with the pliers. With the repro felts I had to start at one end, drill, wire and move on, maybe having to correct the lay of the felt by bending slightly. Sometimes skipping some holes, sometimes drilling two sets of holes at once, all depending on how straight the repro was.
Time taken to prepare, 15 to 30 min. per SS trim. Time taken to drill and attach felts 45 to 60 min per felt. Times 8. Up to 12 hours total. Expensive job if your shop does it.
Regards
Ken
I recently replaced the door felts / glass wipers on all 4 doors of my 69 Giulia Super. These felts have a limited life as you know and when the felt is gone there remains a rusty support stapled with wire to the stainless steel (SS) trim.
First you have to remove the SS trim and old felt by pulling out of door. The original felts were hand stapled (judging by the randomness of the staple placement) to the trim with hardened steel staples that were able to perforate the SS trim. These hardened rusted staples were not easy to remove but they were bent back and pulled out. I saved them in case I decided to zinc plate and reuse. One or 2 SS trim pieces were from an earlier door and had used a different sized staple but were in better condition than those original to the Super.
I then cleaned the SS trim, drilled the staple holes to 0.062 inches, de-burred the holes and buff/polished them with a buffing wheel.
For the front window where the felt is shorter because of the vent window I had 4 NOS felts to use and for the longer rear door I bought 4 from Classic Alfa. The NOS were the exact length, the repros needed to have their ends cut square and then be cut to length.
I then clamped the felt to the SS trim and drilled matching holes where the staples had been. In the case of the NOS felts they laid nice and flat and straight on the SS trim and I was able to drill all holes at once. Not so with the slightly curved Repro felts. The repro felts had an aluminium channel at the bottom, the NOS not.
I decided to use 0.050 inch 304 Stainless Steel locking wire to replace the rusted staples. The 304 was very easily bent and corrected. I thought I might have to make a tool or jig to mass produce the SS staples but found that by eye I could often get them to go right in. Tools I used were small clamps, needle nose pliers, small pliers and side cutters.
I bent the staples, corrected the legs of staple with side cutters, pushed the staple through, tipped the legs in with the needle nose pliers and flattened them with the pliers. With the repro felts I had to start at one end, drill, wire and move on, maybe having to correct the lay of the felt by bending slightly. Sometimes skipping some holes, sometimes drilling two sets of holes at once, all depending on how straight the repro was.
Time taken to prepare, 15 to 30 min. per SS trim. Time taken to drill and attach felts 45 to 60 min per felt. Times 8. Up to 12 hours total. Expensive job if your shop does it.
Regards
Ken