Has anyone rebuilt a Bonaldi / Benditalia / Bendix brake booster (they are the same I believe). I know the simple solution is to buy a reconditioned unit, but I am in fact only cleaning the booster as it has been on the shelf for a good while without covers on the vacuum and hydraulic ports.
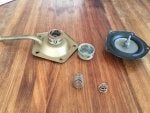
The vacuum chamber / air valve sections are no problem, it is the hydraulic cylinder I am wondering about, I see with a rebuild kit there are various seals and a circlip that you get, but on this cylinder there is no circlip to remove to gain access...any ideas?
Not knowing what the seal system looks like inside the cylinder, I am reluctant to try to rinse of flush out any dirt that may be in there.
thanks
")