Alfa Romeo Forums banner

Rosso Rescue Project Steering Rack Update

34K views 82 replies 16 participants last post by  Alfisto Steve  
#1 · (Edited)
Well, today after church, lunch, and while BJ's Wholesale tire shop was fixing tire with two nails/screws in it for ML's Jeep I had a couple hours to work on Rosso.

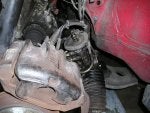
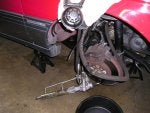
She has been suffering from the dreaded passenger side not designed to be replaced failed rubber mount on steering rack. Being a LHD model with oval boot and centering spring on right side seeing failed mount much less getting to it with engine/power steering in normal position is near impossible. So I decided to drop engine and sub frame down about 5-6 inches so I could get my hands and tools close to rack.

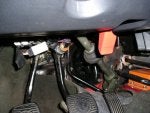
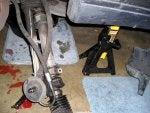
I jack standed patient under front door jack points and put a board on floor jack under engine. I disconnected steering column universal link under dash after removing boot around it by accelarator pedal and bolt in joint.

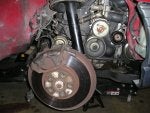
Removed front wheels and front and rear inner fender liners. With board and jack under engine I disconnected upper dog bone mount, removed AFM and top of air cleaner, removed top radiator hose bracket bolt from upper radiator support and removed air deflector next to left headlight.

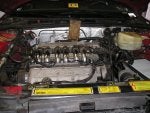
I wedged a board in between false firewall and idle actuator on back of intake plenum. Then I went underneath and remove 6 bolts holding subframe to body. Next I disconnected reaction rod and shift linkage rod (5-speed).

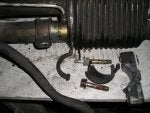
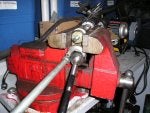
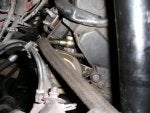
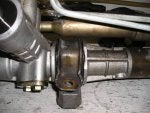
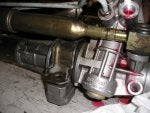
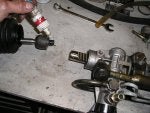
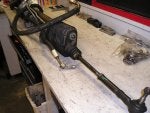
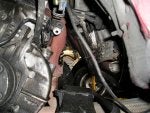
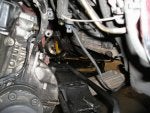
Next, I slowly lowered jack under engine and tranny so subframe and engine came done about 6 inched on passenger side (front of engine side) and about 4 inches on tranny side. Now I was able to see nuts holding heat shield on rack and removed them and heat shield still using long extension from above and ratchet and deep 13mm socket from tranny side. Used 17mm socket and wrenches to remove front studs and rear bolts after disconnecting banjo fitting from power steering pump supply hose and rack pressure hose from pump and pump supply hose and rack return hose from resevoir near tranny side.

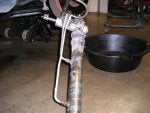
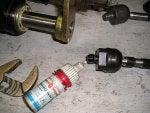
Popped outer tie rod ends loose from steering knuckles using suspension fork and hammer on threaded ends with nuts set flush with threaded ends so as not to damage threads.

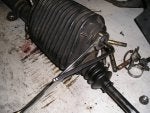
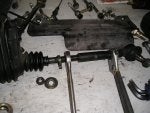
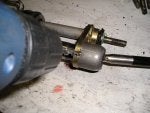
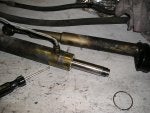
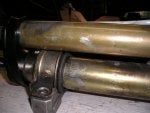
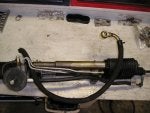
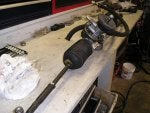
Now with subframe and engine lowered and everything loose, I slide rack out tranny side.

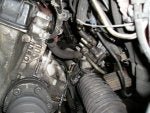
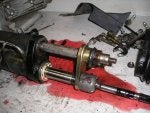
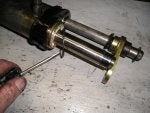
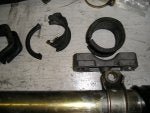
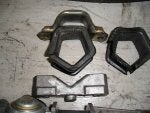
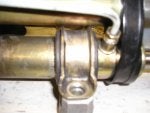
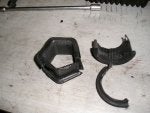
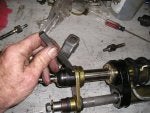
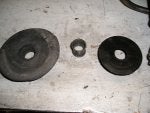
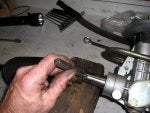
Hope picture show and tell helpful. Notice failed engine side mount (LHD Model), Used a 1/2" drill bit to drill off top clamp. rubber insert shot and what was left came out in two pieces.
 

Attachments

#2 ·
#50 · (Edited)
Can we lower the subframe with exhaust center section still connected?? in you second pic in your second set of pics, I see the exhaust is still intact or am I not seeing it right. I am about to lower it but I paused it looking at the exhaust still in intact.

thanks
 
#3 ·
Third set of pix. Tomorrow is another day to clean up and repair rack.
 

Attachments

#5 ·
Oil leak is from rack hoses being disconnected as you know Alfas do not leak and if they do leak they do not leak much and if they do leak much well it is just the nature of the beast.

As for rubber bushing replacements I am lucky in that I have both bushings like new in stock from my 6000 mile salvage 91L I bought for parts and parted out about 12 years ago. It was wrecked so bad rack was busted so I saved what I could.

Remember my mottos you can never have too many spare parts and never throw away an Alfa part unless it is totally destroyed cause you never know when you can fix/use/save it for later on.

I will post pictures of parts later this week.
 
#6 ·
Leonard and I did this job, but instead of lowering the engine and transmission, we opted for a long 3 ft extention, accompanied by a snap on extension that had a slight degree of swivel to it. I would go underneath the car, and help him guide the socket onto the nuts that held the rack in place. With two people its not too bad, but Steve, you are super human, I would not try to do that job alone, as I would just get frustrated to hell pretty quickly! Oh by the way steve, ever replace stepper motors in a Peugeot before? Just thought I would ask, great job,
Jon
 
#8 ·
Well, there is acces in the pug setup, but god is it limited. I had to break out a piece of the glovebox to get more clearence, but now my hands are all cut up thanks to jagged broken cheap french plastic! Oh well at least it was a clean break and will glue back into place easily that is once I get the stepper in!
 
#15 ·
Still up and need to get in shower on right coast


ML let me stay over here tonight after repair session so I better end this computer madness before pumpkin time and get a shower. I can sleep in tomorrow morning so might hold on a little longer.
 
#11 · (Edited)
Gee, Jon, I've never had cuts on my hands glue up well enough to suit me, clean break or not. What do you use?

On the 164 subject, we're getting so good at pulling engines that I think I'll start doing that to replace the plugs. You know how picky that process can be. It's almost as bad as replacing the air filter. I still have a worn-out automatic tranny to swap for another working one I have. I suspect that if I simply bore down and did the deed, it would take a day. I'll see soon enough. Pulling the engine/tranny from the '93L 5-speed wasn't terrible, nor was replacing it.

And what caused that pinkish tint on the fender? Anything to do with grease thrown from the Ford idler pulley? (actually, my wife's red '92S has the same magenta hue from sun damage on the clear coat. Where it is peeled back, the paint underneath the clear is still Alfa Rosso.)

Michael
 
#12 ·
And what caused that pinkish tint on the fender? Anything to do with grease thrown from the Ford idler pulley? (actually, my wife's red '92S has the same magenta hue from sun damage on the clear coat. Where it is peeled back, the paint underneath the clear is still Alfa Rosso.)

Michael
Different sides of car so Ford had nothing to do with it. I wonder if clear coat removed it would let the true Rosso out?
 
#17 ·
The steering racks for the auto transmission are reported to have limited travel (in at least one direction, but not both) for just the reason you mention. I haven't verified that, but it is true that the turning radius is bigger for the auto transmission cars (in at least one direction)... Sorry that I don't remember which direction. It may be mentioned in the CarDisc or other manual.

Michael
 
#18 ·
Sounds like somebody put in a manual rack which has equal turning radius both ways whereas the A/T rack limits R/H hand turn radius because tranny sticks out into wheel well and has a special front fender liner on that side.

Racks with centering springs came originally on S models and then on L models starting in 91. I parted out a 91L w/AT manufactured in 11-90 and it had one with damper/oval boot and limited turning to right. I have 4 early model 91 164 (B/Ls) with no damper.

My 93L, my son's 92L w/5-speed both have oval boot racks with equal turning as does his 91S.

Tricky process to get correct rack for 164 because of teeth on rack shaft being hidden under round boot driver's side and there are less on one end for AT models.
 
#19 ·
Sounds like somebody put in a manual rack which has equal turning radius both ways whereas the A/T rack limits R/H hand turn radius because tranny sticks out into wheel well and has a special front fender liner on that side.
Thank goodness, now I can stop looking for the cause.

Mine must have come from the factory with a manual rack.
 
#20 ·
Will post pictures as I progress, but looks like I will be resealing rack as right oval boot filled with fluid and right inner tie rod end has major play in socket. Lucky me I have new seal kit and new correct R/H inner TRE for rack with damper in my parts stash.
 
#21 ·
#22 ·
#23 ·
After seeing this, I'm thankful I've got an early car with a non-dampened rack. But is access any easier with the non-dampened rack, or would you still recommend dropping the sub-frame?

On an only somewhat related note, several years ago when I had some body work done and the sub-frame replaced, the steering wheel was allowed to rotate 90 degrees when they had it apart. Naturally, they re-assembled it exactly that way, and to this day my steering wheel is 90 degrees off. Since you're in there Steve, any thoughts on whether I might be able to open up a pinch bolt and rotate the steering wheel back where it belongs without un-bolting anything else?
 
#24 ·
I think maybe with early models the universal joint(s) can be disconnected from rack and steering column as I remember but on this 93 it seems only one removeable joint at rack and one at column was removable. I had to drop subframe to get rack off U-joint. Maybe I missed something but I needed the room anyway to get to rack bolts and to get to heat shield.
 
#25 ·
I did my rack about 3 years ago and when re-assembling, I got the wheel off by a couple of splines. Bothersome, but I could live with it. Later, the ignition lock failed. Since the steering wheel had to come off anyway to replace the lock, when the wheel went back on, I moved it one spline and it is now straight.

This translates to a few less degrees rotation from the center position to one side as compared to the other, but it is not noticable.
 
#26 ·
Since the steering wheel had to come off anyway to replace the lock, when the wheel went back on, I moved it one spline and it is now straight.
That was my initial thought on how to "fix" this, but seeing as how I'm a full 90 degrees off, that's too far to move it.

I need to get my head in there and look around, reminding myself why I like working on RWD cars so much more. :D
 
#27 ·
I'm not sure the rear wheel drive cars are any easier - newer cars seem easier to me now simply because they are relatively clean and usually have less bodging. This 164 I have now has been relatively untouched like that, and it's so much easier to work on than cars covered in stripped bolts, 40 years of oil leaks and wiring held together with electrical tape it isn't funny.

I think the most difficult job I did on an Alfa was replacing the rear disks on an Alfetta GTV. Not only because access is a bear, but because those bolts are so tight they take monstrous amounts of force to remove.

Access to the steering gubbins on a 164 isn't that much harder than an Alfetta, once you know what you are looking for. In fact, I think pulling the rack on a 164 is about the same as a power steered Alfetta based car.
 
#28 · (Edited)
More rack repair info and pix

Well, rack repair without replacing seals is done and Rosso test driven. I tested rack with engine and power steering pump by hooking it up to a spare reservoir outside of the car and started engine while it was resting on jack.

No leaks, so I replaced bad passenger side inner tie rod end, replace bad mounting rubber bushings and put it back into car. Will have to get alignment check to verify 0 toe and set steering wheel to center as still off to left about same as before I replaced bad parts. Very responsive steering now.
 

Attachments

#29 ·
#30 · (Edited)
Want to see some more?

Note Three inner tie rod ends. top one used on driver's side and both sides on rack without centering spring but can be used on passenger side of centering spring oval boot racks if you use a spacer to make it flat like correct one. Correct one for those racks is lower ones with flat face next to threads (this one hard to find). I got my spare off eBay from Canadian seller.

Also there are different brackets for passenger side as shown by two in picture either one will work.

I used blue "loctite" and stacked inner tie rod end. too.
 

Attachments

#31 ·
Once I had rack back together with new inner toe rod end and new/used rubber mount bushings it was ready to go back into car.
 

Attachments

#33 · (Edited)
Some rack installation pictures

Lucky me with subframe and engine lowered rack went back in pretty easy. See how much room I had to work with. as you can see my son's Maser on other side of 164 looking through where rack goes.
 

Attachments

#34 ·
I can't believe how much more room there is with the subframe dropped. With it in place there is so little room. I bought 3"-long open-end wrenches from Sears so I could turn the mounting fasteners more than a couple of degrees at a time.
 
#40 ·
Thanks - these nuggets of info tend to save me a panic later, I find.

I recall I had one other car once that spilled fluid out of reservoir if the steering was turned with engine off. I think that was my Thema.

-Alex