Alfa Romeo Forums banner

New project 77 Spider

42K views 162 replies 28 participants last post by  Davo1954  
#1 ·
Well.. this makes an even 4 Alfa's.. Two GTV's.. Two Spiders.. shoot me...

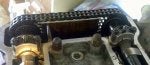
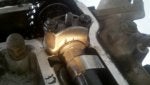
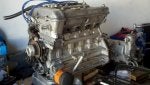
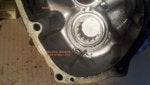
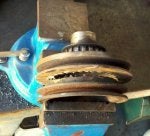
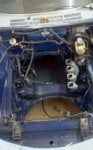
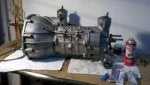
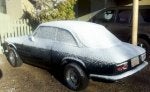
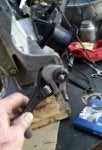
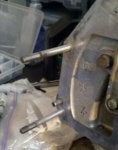
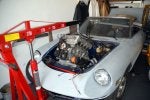
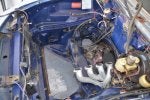
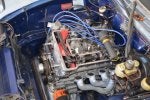
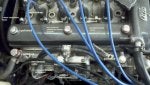
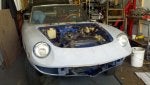
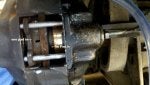
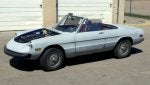
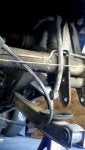
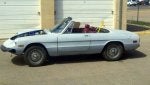
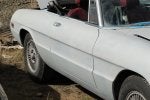
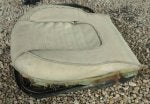
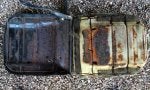
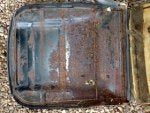
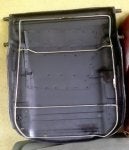
77 Spider, from a good guy in Colorado. Original blue under the primer, minimal rust, spare tire well, a bit of a surprise under the seats around the drain holes, but rockers and fenders solid. Spent a lot of it's time in high country Colo., so dry and thin air. Dash is a bit crispy, interior apart but ready to detail and redo. Soft top frame is good, cloth is mummified. Seems a good solid basic start. Runs, has all original emissions... which may vaporize soon. And since I have my 79 coming out of initial body work...then putting on a rebuilt head and a few other things on the list, I may make this the summer runner, assemble and make safe...drive local in the mtns and take notes.... attack it this winter...
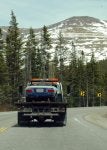
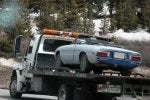
And something about pictures of an Alfa on a tow truck that I've always liked.. Should be a thread just for those.. ))
D
 

Attachments

#2 ·
Starting in on the car

I left the car up in Colorado for now, no space in Santa Fe until Sept. But brought along some small stuff for evening projects until then. I said the car is fairly rust free, but...all it took was starting in on the seats to change my tone. I forgot what a swimming pool the seat bases must be over the years. So.. something I haven't done over the years of rebuilding my GTV's, I'll rebuild the seat bases best I can. My MIG welder is a basic unit, burns thru sheet metal like a butter knife.. so until I get a better one, "Cut and Paste and Rivet" works. Cut out the main rust and weak areas, ground down the rust remaining and treated with 3 coats of Rust treatment, primer, riveted in repair pieces, reprimed and painted. The base seat wire was rusted away along with the springs, so made 4 wire frames for the eventual 4 seats that will get rebuilt. Other threads will get me thru the spring/Oring thing. And either have a local guy build new seat bottoms with a bit extra support, or go with suppliers units. Anyone have good luck with an upholsterer reproducing the seat bottom out of foam?
Rebuilt the wiper motor and detailed the worn wiper arms. Sorted thru two boxes of nuts and bolts from the interior being taken out, cleaned all those and cataloged. The front lower nose valance is pretty wiped, so I'll get/find a good used or new IAP one and that'll force me to get the better MIG.
 

Attachments

#4 ·
A bit of an update... Got the car down to Santa Fe in a tow trade with a Corvette buddy and his covered trailer. I drove his rental truck to Denver with all his stuff, and he picked up the 77 on the way back.
Got the car running a bit better with a fuel filter in back, a hint of things to come though... The short story is... fuel tank out de gunked, Spica oils and filter replaced, TA sticking and temporary homemade one that helped.. Plugs fouled, replaced and then... knowing when to stop....gave off the car to Gordon to dial in.
I was on the right track, but not sure I would have figured out that the two new fuel lines from the PO at the external pump were crossed, add a new in-tank pump and more adjustments and Voila... the car runs great.. Ta da... So the fuel system is a done deal for now. I had put on the 74 exhaust manifolds, new exhaust with Ansa tail along with a driveshaft support bearing and Guibo before all this. All new oils in everything and detailed the engine comartment a bit like we all like to do.
There should be a 'CSI Alfa" show.... Forensic drama under the hood and on the road....
Which leads me to the drive from the shop to home.. 70 miles, primer grey, no bumpers, two seats and an ashtray early Fall drive that is as fun as it can be.. 75-80 mph all the way in 5th gear, including pulling a 1000 ft hill just before Santa Fe. And luckily I kept it in 5th.... )
Pulled off the highway, hit the lights perfect so no need to downshift immediately, but once I tried for 4th... nothing..... 5th.. sure... 4th... 3rd... not gunna happen. So park it, sit there visualizing and a 5th/Rev fork issue seems the best possibility. I got it to my shop a mile away later that day. (This is where my friends look at me funny and wonder why I like Alfa's... and this is why.. I like Alfa's..) ( besides the surprise $$ that I'll need to do this before I was ready).
SO.. the engine and tranny come out in 3 hours, on my metal bench. Seperate the two and set the tranny aside for now, Clean and detail the engine exterior, make my list of replaceable's, off comes the clutch/flywheel for lightening and replacement. Front and rear seals to be replaced, mounts will be changed when I get that far, and other things medium and small to play with. I drained a small quarry of material out of the OVS, not sure if its still any good, and another quarry of stuff that had gently plugged the cooling system drain plug on the back of the engine.
Gordon had mentioned that the engine had a bit of flat spot. Compression is 145 across, so thoughts of camshafts or something... Off comes the valve cover, clearances all good, remarkably clean insides and healthy stock cam. Lined up the timing marks on the pulley... and the picture shows where the marks are( not). It's almost 1/4 inch off... 77 emission car?
I'm also using this car with two kid therapy clients... Both guys come on Saturday at different times, and a very fun, gratifying hour of using the Alfa and all it's needed work as metaphor for whats going on with them and their 'issues'. Not much of a stretch to relate to a 15 year old, a neglected maintainence Alfa and the need to take better care of self, family, learn, listen, 'fix' mo better and the satisfaction of figuring and fixing 'thing's" out...
Back to the shop this weekend...
 

Attachments

#6 ·
Cam's... one tooth off... moved each cam one over with crank pulley on 'P' and they both sit square on markers now. Sometimes it's simple....
The car ran fairly well with them off that much...I'll be curious once it's back on the road...
 
#8 ·
Sometimes it's easy...

well not easy... pulled the engine and trans, sweating how much is munched inside, etc. But today we dug into the tranny on my new Sam's Club stainless table BUILT for tranny autopsies..
Stuck in 5th, the few threads on this all talk more about the bolt than a broken fork.. The fork is pretty substancial.
The transmission wasn't that dirty on the outside cases..nothing like the engine... the engine with cams off one tooth and looking pretty clean internally even after all the sitting in the Colorado tundra..
Sealant on all surfaces, minimal leakage front or rear seals, clutch disc was worn more on one side than the other, but not oil soaked. What I'm saying is the bolt on the 5th/rev fork came loose apparently, uncorked it self on my drive from ABQ to SFlee and the little ticking noise we sorta noticed before probably isn't there when I re-assemble everybody.
The internals are quite clean, perhaps the trans was gone thru 'recently' (milege wise). It shifted fine, even second, but with no pedigree history, guessing. So.. I'll split the case this weekend with my other assistant and decide from there.. Pic's show how I found the debris field and the rear gears with no cleaning on the gears...
 

Attachments

#9 ·
So.. Split the case and the interior was clean and relatively free of any metal filings. Dog ears adn points on all gears are sharp to relatively sharp. One of the other fork bolts wasn't secured with the tab, so all three bolts are tightened with locktite and tab bent. A good spraying and cleaning of interior parts and buttoning back the transmission this weekend. New trans mount in the freezer to install. New exhaust hanger mounts installed. Dodged a bullet this time it 'appears'.
Engine... I had my assistant air wrench off the crank pulley. The pulley did double service with the 77 air pump system. But now it doesn't. .") Drilled out and then cutting disc nicely split the outside pulley off. Then a grinder and sanding, primer and paint, lightly (320 grit) crank pulley ID and OD. One of those things you do on a nice cool Fall afternoon. New crank front seal, cleaned the whole area and a new Spica belt will go on a bit later. The oil pan gasket is remarkably dry all around. New Spica filter in there.
 

Attachments

#10 ·
trans back together

On my bench in the cozy storage/garage. I made two new tabs for the fork bolts, locktite all three. Cleaned all mating surfaces, and re copied the sealing job the guy before did, very effective mix of Blue RTV/ and the dark brown gasket sealant. The blue goes around every bolt hole, making a shoulder into the hole. This transmission was close to leak free. We'll see if I can get the same result. New seals front and rear.
I'm using the clutch disc out of my GTV that we went thru this summer. The disc has just over 9 mm thickness, fairly equal on both sides and plenty of space to the rivets. Sanded and sprayed lightly with 'Brake Kleen" to pull out any dust and oil. Pressure plate from before, new TO, new clutch slave just in case.. I had rebuilt the slave in the summer/worked fine/but it would probably be a 'Murphy Moment' not to replace easy off car.
I'll finish the engine replacements later this week I hope. It's snowing outside and a good week to close the door and clean and prep the engine parts. Seals, new mt's, and making a copy of the starter support mount to use on my other cars.
Starting to clean and detail the engine compartment, mostly road grime and some oil/dirt accumulation, but again, for 110K, the car has been nice to me so far.
 

Attachments

#15 ·
Forza... I guess I need help understanding that cam thing...Something I haven't stuck my nose into too far... :)... What benefit did it give to be that far off the alignment marks?
After we got the Spica sorted out, the car ran well but had somewhat of a flat spot when I drove back from ABQ. A 1977 car that had lead a restricted life for the most part..I guess i was hoping that I had discovered an issue/the problem with the cam's so far off line, and especially now with the better exhaust manifolds and such.
Looking from the rear of the engine to the front... both marks on the cams were to the left by almost a 1/4 inch. I almost went the "align a different hole" route, but realized that just a tooth difference brought both exactly to the line marks on the cam caps... with the pulley on "P".
Now.. I haven't got the engine back in since making that adjustment, but hoping that it was a step forward..
Stock cams for now, head is stock as far as I can tell too. Valves look good, with some/not much build up on exhaust. But I won't be pulling the head during this round of 'This Ole Alfa'. ( I hope ).
 
#16 ·
And today was one of those little things days. Snow on the ground in the morning, two therapy clients and a video file check for this weekends big presentation..... and the late afternoon was mine. I'm trying to sneak in a few hours a day this next two weeks, while I can.
Polishing wheel for a few engine parts, getting old rusty coverings off, new gaskets where needed. I cleaned off and checked the clutch pressure plate, again it seems fine, no heat cracks, prongs in good shape, 180 grit sanded the surface and it's ready to go back to work.
This engine.. when I pulled it out.. was connected to the tranny with maybe 4 bolts? Two of the lower studs, a starter bolt, ( yes, one starter bolt), and one other. The two top bolts... poof. Amazing it held together. The threads on all 4 of the studs were hurt a bit, so re-threaded with tap and die set. Straightened one stud and a dry run with a bellhousing has things going back together smoother soon.
Motor mounts are replaced.. loosely. The one 'special' nut to come off on the starter side is much easier to defeat on the bench. Still took two different 13mm combo's and a screwdriver as a extension to get the one closest to the back of the Spica. I'll leave them a bit loose after the GTV engine R&R and stiff mounts install.
Flywheel comes back lighter in a few days, and then I can assemble everybody, old and new, rebuilt and reused, cleaned and cut, loctited and sealed, oiled and retorqued. What world problems?...... a nice day.
 

Attachments

#17 ·
As I remember it, it allowed the intake cam to open slightly early and allowing a mildly greater intake charge to enter the cylinder. Since the cams rotate twice (720 deg) for each cycle it really isn't all that many degrees off. I don't remember a change to the exhaust cam, but I have slept twice since then and my memory may be foggy on that part. Maybe someone else remembers that tweak.
 
#19 ·
ok. where was I....

Cold desert winter appears to be over... for now... So I had a chance to get over to the garage/storage and stick the engine/trans in. There's more than a few of these pic's similar on BB, but I'll add to the pile. Going solo, I got this puppy into the car in about 35 minutes from attaching it to the hook. Patience, a little up and little down, push a little, focus on the motor mount area, jack on the tranny, get past the shifter and firewall, get past the frt roll bar, both motor mounts and trans mount attached and Voila.. lunch time..
During the winter, I assembled on the bench as the weather and my heater would allow. Lightened flywheel in there, new clutch slave, pressure plate cleaned up, new TO bearing, cut the front pulley down, toothbrushed the engine, etc., etc. Cleaned the engine compartment to a B+ maybe... the original paint under there is in decent shape, a little touch up once I get things attached and wired up, but this is going to be a driver so no white gloves...
I rebuilt the front brake calipers during the winter.. didn't split them, but new rubber and cleaned spotless in the sink. Old brake shoes are fine, brushed the pads, roughed up the surfaces and re-installed... Turned both front rotors after drilling a curved hole pattern into the brake surface, just because I can... mostly looks I know, but my other Alfa's have the same. its tradition now.
So... I'll get the rubber and wiring and radiator and all that back together over the next two weeks in between work and photo stuff. Glad I took pic's of the wiring and such. It 'should' fire up fairly easily, since most of the work was near the trans and flywheel, finding the cams off one tooth, heli-coiled one cam bearing cap bolt hole, adjusting the chain, getting 3 or 4 tablespoons of sand and mystery material out of the cooling jackets, cleaning bolt threads with tap and die, and having fun in this crazy world... )) cheaper than therapy....
 

Attachments

#21 ·
So... engine in, wired up and all the little stuff. Started on first spin... really... Then I noticed oil pools forming in two sparkplug wells. New VC gasket, tightened nicely, but still seeping out inside right side. Intake manifold water bleed nut/screw thingy was screwed up, leaking, and a fast idle from deep space that I'll figure out manananana...
So another reason to keep old or spare parts about. I found a intake manifold I've had for 15 years probably.. in a container in storage.. in the back.. .at the bottom.... in the corner of the stack of containers..and found a replacement bleed screw/nut thingy in great shape, installed and took care of the only leak.
So, as I let it idle for a few minutes to get warm and get the new coolant circulated, I realized how much 'little stuff' we do to these cars. Stuff that others can't possibly know we've cleaned/rebuilt/replaced/polished/rigged/improved/
eliminated/etc/etc/etc...
So.. a small visual tribute to a small area of the engine compartment and what I can remember what I've done so far... what you can see.. :)
A great way to spend a Sunday afternoon...
..and self bled the front rebuilt calipers/brakes using a ski pole (that's all I could find that fit to the seat) to pump up the pedal and hold pressure by the flex of the headrest of the drivers seat. Three pumps per side and brakes are tight..
 

Attachments

#22 ·
Rear brakes.... pulled both rear calipers after trying to retract all 4 pistons on car with bleeders open. Two retracted 'ok', one retracted slowly, one... is clearly retarded.. :).. Sent off the rotors to get resurfaced, electric wire brushed most small parts, tapped and died wheel studs and lugs that were tired. Brake shoes are actually in good shape like the fronts, so cleaned up the surfaces for reinstall.
Had invaluable help with the bleeding process and now... to help loosen the caliper pistons as much as possible on car. One side at a time, with the other side 'restrained' with a 'spacer' that kept the pistons at bay. Large channel locks allowed me to compress the pistons after we pumped the pedal to push them out, clean the piston and do it over again.. and again.. and again. The right rear loosened up very nice. Left side... outer piston came around after a few rounds.. but the inner piston... like the middle child... just stayed where it was. maybe a 1/8 inch 'travel'. Better than nothing, but not much to work with. Able to get penetrating oil on the piston exposed, compressed the piston back with a careful vise and one last pedal push to get it out as far as it can for now.. I reassembled the right side with wheel on, caliper bled, shoes in. I'll assemble the left side with everything besides the inside shoe, maybe heat up the caliper/piston area for a bit to break loose anything that might feel inclined to break loose and try to pop it out with pedal pressure again. Ultimately will put new rubber on both rears like the fronts, but not in the mood to use grease or C-4 explosives yet...
So... assembled the shift tower area inside ****pit..Filled the transmission with oil from the top, .new inner and outer rubbers, cleaned up and slightly cut the opening of the thick rubber collar and it's metal top. All buttoned up and hopefully oil free for a few years.. ).. I'll be laying Dynamat on the floors and firewall later.
Stopped oil leak on the valve cover. The inner surface of the cover is slightly 'warped'. Got a .020 feeler thru with straight edge. So some blue stuff on that area, let it set, tightened valve cover just past snug and let it sit for a few hours before I started it.. Voila... no leak..
Back in a few days to finish the brakes.. the emergency brakes are in great shape now.. cleaned gunk out, anti seized surface points, adjusters work, eliminated any possible rust/sticky points for future rotor removal.
 

Attachments

#23 ·
brakes finished...

What a difference a day makes... or maybe it was the country western radio station I tried out today.... :)
Re-assembled the left rear brake area, bled out the lines one more time and removed the inner left rear pad. 10 pumps of the pedal and the stuck piston, came out of his closet to expose the gunk holding it back. That allowed me to pull the caliper off, pop the piston all the way out and clean out the cave, new seals on both piston holes, cleaned and reassembled.. one last time... and the brakes work much gooder now.. :).
So..., lets review.... All four rotors turned, old pads cleaned up and re-used, bearings packed, all 4 calipers with new rubber seals and boots. Any hurt threads cleaned up, emergency brake linings/mechanicals cleaned up, (now works great), anti-seize added where needed, tires on and reliable brakes done....
Ran the engine for 30 minutes with a spin around the south of Santa Fe to test brakes, remembered the front bumper wasn't bolted on... oops.. but luckily it stayed put. Engine temp and oil pressure good, the transmission shifts great, and quiet now with the new rubber to insulate the sound,even without dynamat and carpet installed.
 

Attachments

#25 ·
Steering wheel and interior... the wheel has, from years of sitting outside in high altitude dry sun, got issues. Three cracks, the worst one in pic below. From the other threads on this, I've scraped the old finish off with a old but sharp triangle scraper, a little sandpaper and a fine rat tail round file. A majority of the finish came off with the scraper, with the steering wheel still in car. With the steering wheel wheel locked, very easy and almost relaxing to sit and scrape. Bare metal floorboards for now so a power vac cleaned up my mess easily. The round tail file gently on the backside of the wheel were the 'finger' grooves are, and sandpaper used carefully around the spokes and such. Now that its roughed out, I'll have to dig thru boxes and my long term memory files to remember where I put the steering wheel puller to do the finish work. Sometimes I spend more time and questioning my sanity looking for tools....
The threads on this have lots of options for new finish. And some mention of stain. I didn't think this wood would need a stain? Will it be too light without?. I don't want the darker finish on it, but don't want it looking like Pine either.
I'll see if there is this 'Interlux Schooner Varnish' in NM. We don't have a lot of Schooners here in the desert.. :)
And.. starting to sort thru 4 bags of assorted screws, nuts, bolts that aren't marked, most look like interior related pieces. the interior is basically bare for now. Door panels are on temporary, and the seats in to sit on. I've 'rebuilt' the console and got the wiring all sorted out, ready to assemble when the rest of the interior is put together.The wiring under dash is in good shape overall. Fuse box needs cleaned and contacts cleaned, correct fuses put in, and a few owner added wires that go nowhere traced...
 

Attachments

#26 ·
Had a few hours in the middle of the day...
I've had a set of springs, front and rear from IAP for over a year sitting on my parts shelf. Not sure which Spider to put them on.. but it looks like the 77 will be on the road first.. So.. here's the original springs from rear.. and new IAP Red springs going in. Pic is of the car after JUST the rears have been changed. Didn't do anything with spacers or rubber. Actually a quick job, no rust issues at all, clean and intact parts. For now... going with the original shocks which were dry and gave some resistance when re-installing. Anti-seize on cleaned bolts and bolted right back up. Ride height dropped 2 inches total on the rear. 24 inches at wheel well top.... 26 on the front.. for now... Front springs maybe later this week.
 

Attachments