Alfa Romeo Forums banner

Assuming you don’t have a “real” 2 or 4 post lift, what do you use?

11K views 29 replies 15 participants last post by  Alistair Muir  
#1 ·
I’m not quite ready to go whole-hog and get a 2 or 4 post lift, so this question isn’t about that.

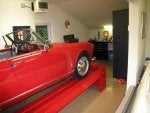
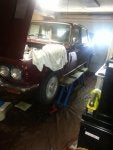
For you guys who haven’t made that ultimate leap for your home garage, how do you lift your Alfa? Right now I have a modest floor jack and some stands (and some ramps I never use) but I don’t see that as a good long-term solution.

Some options that come to my mind:

1. Whole-car scissor lift
2. Floor jack to lift the entire front or rear end, as required
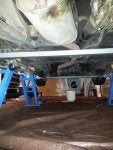
3. Floor jack to lift just one wheel at a time
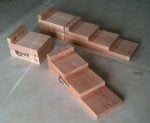
4. Ramps
5. Bottle jack
6. Grease pit
7. Drive up onto the curb (don’t laugh, I’ve seen it done, but not with an Alfa)
8. Something else (please explain)
9. I never mess around under there

TIA
 
#2 ·
I've got 2 - 2 ton substantial floor jacks and 4 - 6 ton jack stands (2 of them are really good, the other 2 are ok) and am getting by quite well. Of course, I'd love to have a post lift, but that's not in my future I'm afraid.
 
#3 ·
Before I had my lift I looked around for the jack that would give me the highest actual lift and some beefy jack stands. Did lots of work with that (engine removal, transmission removal etc.). I've also got some rhino ramps that I still use occasionally.

Whatever you end up going with make sure that it meets your needs for your most frequently done work. Some methods can make it a lot harder to get things such as exhaust and transmissions out from under the car, others can make it harder to to wheel/suspension work. Some take longer to get the car on and up.

So why don't you tell us what jobs you do most?

Kevin
 
#4 ·
When we lived in Long Island I had a 4-post lift, but when we moved to Connecticut our garage has a low ceiling. So I got a KwikLift. The ramps pivot in front while the rear is lowered/raised with a floor jack. Drive the car onto the inclined ramps then raise the rear. Works fine in my situation.
 

Attachments

#6 ·
Hey Randy,

I've been thinking of going this route as a compromise. I'm in the same situation as you - two single-wide garage entrances and a 9' ceiling.

I have two questions:

1) Do the wheels tear up the concrete floor at all, either as they roll over it during the lift process or when set in a specific location?

2) How's the access to the misc areas of the underside? I assume you can't really get at the drive-shaft and other stuff in that area.

Thanks
 
#7 ·
The lift doesn't hurt concrete floors at all. During the lift process the back wheels only move about an inch. When the lift is collapsed it rolls around on 4 plastic wheels attached to the crossbars. Access to all underneath components is good. If needed one of the cross bars can be removed for trans removal etc.
 

Attachments

#9 ·
Back in early 2000 I bought two 6 ton high lift floor jacks from Harbor Freight. They have a total lift height of 37" and I added a cross member lift to them. I lift the cars from both sides to the about half way at a time and support on 6 ton jack stands.

At the end I put the 6 ton jack stands on some 14"x14" welded boxes with lips so that the stand is only about half of its total lift height. This gives me a total lift of almost 42" that is very stable and I can place the stands where they are out of the way of what I need to work on.

The floor jacls were meant for lifting heavy trucks and vehicles so lifting the Alfa is a piece of cake. I normally just use the foot pedal Great for doing body work so I can sit in a chair and just do waht I need without kneeling or getting down on the concrete.

If you are looking for lifts, two post, four post or the EZlift type take a look at Gregg Smith Equipment. Have purchased some small stuff from them and stopped into his store in Indiannpolis last month. Seem like great people, prices were great and they have every toy that a gear head would ever want to equip his garage with.
 
#10 ·
I've thought of going this route, but haven't for two reasons, first the need for a fair amount of space on either side (or front and rear) for the jacks, and second (not as big a deal) the minor trouble of going back and forth between the two jacks. But, yeah, two beefy floor jacks and a beam on top of each one is an option.

Thanks for the tip on Gregg Smith Equipment - I'll check them out.

Back in early 2000 I bought two 6 ton high lift floor jacks from Harbor Freight. They have a total lift height of 37" and I added a cross member lift to them. I lift the cars from both sides to the about half way at a time and support on 6 ton jack stands.
 
#11 ·
With the two large jacks I normally do front and rear lifts. But if the space is tight I just swivel the jack to the side and lift. And if you hae the weight like I do the foot pedal lifts the car and you do not need the space to move the handle up and down.
But the jacks are BIG so storage can be a hasle. Oh and they are HEAVY MFs
I do not think HF sells them anymore. Have not seen them in the store or on the web sight.

The other approach is to look on CL for a air/hydraulic bumper jack. They work great and no muscle needed, But again storgae is a hasle.
 
#16 · (Edited)
… and involves a lot of saliva when pronounced (I can say that - I am of German stock :lol: )

+1 for the EZcarlift. I bought one a few months back, and am very impressed.

Image


Image


Unlike the hydraulic scissor lifts, you can move this one with a single person (including initially picking it up and setting it in place) as it weighs only about 150 lbs in total - and no single piece is very heavy (for assembly). You can store it up against the wall (assembled or disassembled), and it does go up fairly quickly. There are no safety pawls to stop if from collapsing, but the worm drive is pretty sticky even if the transmission were to fail. And no pesky hydraulic or air leaks to worry about.

Down sides are (in my opinion) that you may have to invest in different cross-bars for different vehicles (depending on lift point separation), and that you need a 7A+ electric drill (which adds about $100 to the price - get a good one, or you may find your car stranded on the hoist, with a burned out drill!).

It really is a great piece of kit, and the owner, Boytcho, is great to deal with.
 
#17 ·
I can recommend having a pit in your shed.

Mine is deep enough that I can stand under any of my cars, tho I'm not the tallest bloke (didn't get to the 6 foot height), but not quite long enough to get under the full length of even my shortest car.
Obviously no good for removing the actual car supporting parts of the suspension, but great if you need to exert some serious torque on a bolt or nut before lifting and sitting on axle stands.
Replacing anti-roll bars, tie rod ends or steering racks/boxes would be very doable.
Great for building/repairing/modifying exhausts, replacing a clutch or gear box or even to undo the rubber coupling bolts for tailshaft removal, in my 75.
Not the be all and end all, but very very useful.

Tho be aware that LPG is heavier than air, so any LPG leaks will settle in the lowest places and if it can't dissipate, like it couldn't in a pit, then there is a very real fire/explosion risk.
I don't have any LPG fueled cars, no BBQ in the shed and Acetylene is lighter than air, so if my Oxy set has a leak, it escapes out the gaps in the roof.
 
  • Like
Reactions: Norseman50
#21 ·
I've seen a picture of this done sucessfully: if you can find just the right three-legged jack stand with the right geometry it will fit under the scissor. Get four of them and you're probably 99.999% safe and you won't be taking up much additional room at all.

I'm currently at a computer with a slow internet connection. During the week I'll look around to see if I can find the image again. I seem to recall that the key is to have the lower cross-member of the jack stand high enough so it can straddle the EZcarLift "axle."

4Canada, do you have any problems with the lift wheels tearing up the floor? I'm trying to decide if I should also order the protective plate option. TIA
 
#22 ·
My floor is less than 6 months old, with a smooth polished finish. There is some shrinkage cracking, but it is 5" thick with 6x6 wire mesh reinforcement. I cannot even see where the wheels moved on the floor. I think, if you have a painted or epoxied floor, the plates would protect the finish. But for good concrete, the protection plates are overkill IMHO.
 
#24 ·
I have a painted concrete floor - just not sure how strong it is. If I were 100% certain that it was thick and reliable I'd go with a 2-post lift, but I can see a few cracks in there, and since I don't want to go with a 4-post I think the EZ might be the next best thing.

Here are some pics off the inter-webs with jack-stands for extra safety. They really don't take up much additional room.

Image


Image
 
#25 · (Edited)
Thanks for those pictures, Spinner. When I do my front swaybar swap, i might just do that, as i'll be reefing on the car to pull the old one out (no clearance), and definitely "committed" to being completely under the car!

I agree about the post lifts (especiall 2-posters) needing a competent base. That was my reasoning for going this route as well.
 
#26 ·
A Platform for Daydreams

A bit off topic perhaps but resonates a bit relative to the insanity of this addiction…

My garage floor is old, damp, crumbly and hardly level. Logic would indicate that fixing the garage should come before restoring an Alfa but... “there you go”… the insanity prevailed. So I built a platform inside my old garage. One unplanned luxury was hours spend just laying there staring up at the rig…not laying on cold, damp (and crumbling) concrete. :wub:

Insane….But level :devil2:

Plenty of dry space for wrenching and daydreams :tongue_smilie:

Logic is debatable but not sure I care :sneaky2:
 
#29 ·
An Evolutionary Jig

Yea, that wooden job is kind of interesting… at least to me. I was rebuilding the suspension including the T-Bar and so was looking for a way to get the rear axle off and back onto the car. I rather like wrenching alone and had figured that getting it back into position was going to be the greater challenge. So what I wanted was a method to lift the axle and position it precisely and in a safe and stable way.

There are four elements to this set up:

A rather strong cradle made from a left over chunk of pressure treated 2 x 12 with short plywood end caps screwed and gorilla glued on the ends. These plywood end caps make a kind of “U” shape cradle and include semicircle cutouts which support the axle tubes such that the lifting loads are wide (so stable) and out near the suspension mount point but with enough space to get the spanners onto key nuts and bolts. The “U” is as vertically short as possible without touching the differential. This protects the differential casting and allows my low profile floor jack to fit under the cradle even when the car is on the ground.

It was not my original intension but I found this to be the easiest way the lift the rear of the car. I just drive the front up onto ramps, jack the back up with the cradle and position the jack stands under the rear rocker support points. Once the car is up and SAFELY on jack stands, one can easily lower the cradle/axle to “rear suspension spring neutral”, the height where there is neither compression nor tension in the system hence the ideal height for removal. The axle hanging straps must be removed and that is neither easy nor elegant… but that’s a different story! Anyway, the second element of this wooded setup amounts to two additional rectangles of plywood, which are then easily screwed onto the outboard ends of the cradle whilst the rear is hanging at suspension neutral. They are sized to touch the floor and provide a stable platform for the axle once free from the car.

Reinstallation of the axle led to two additional wooden things. The cradle makes it pretty easy to lift the axle so the plywood rectangle can then be affixed (as above) to preposition the stuff for easy attachment. The act of balancing and lifting the free weight of the axle made me a bit nervous and what became clear is that the position of the jack’s lifting head needed to be correctly place under the axle / differential center of gravity. So the third element is two little scraps of 1 x 2 screwed to the bottom of the cradle in a “V” so the jack head can easily be positioned correctly. The “V” opens rearward which has the additional benefit of allowing the floor jack to be rolled under from the rear “by feel” which further provides for easy lifting of the rear end.

As one lifts the axle and attempts to preposition it, side to side adjustment can be made with a gentle shove… just don’t push it off the jack! For-aft adjustment can be made by rolling the jack stand but in my case, my insane wooden platform with plastic mat covering, necessitated a board to allow it to roll easily. And I didn’t want to crush the plastic mat under the little steel wheels. So the forth element to this madness is that roller board to which I added little side guides to make aiming the jack by its long handle easier and to prevent the jacks wheels from falling off the edge.

OK, so I can be wordy as hell but this set up worked really well. And I rather like how it evolved from a support cradle to a comprehensive lifting and positioning system. Like a tool developed by natural selection and a spontaneous dance with a greasy date hence my attempt at humorous provocation; An Evolutionary Jig. Thank you for taking an interest in my insanity.