Alfa Romeo Forums banner

3.0 Litre 24 Valve Conversion Street Verde!

86K views 194 replies 39 participants last post by  AJMICHAL  
#1 · (Edited)
FOR SALE: 3.0 Litre 24 Valve Conversion Street Verde!

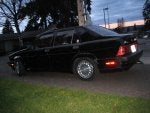
I like the ' 95 LS wheels on it.... Clean and really brightens the car up...

Just put 17" TSWs on my LS ( My New 17" TSW Wheels; - Alfa Romeo Bulletin Board & Forums ) and cleaned these puppies from the LS up for the Verde's street tires...

What do you guys think?

UPDATE - 9/28/08: I have started the 24 valve conversion on this ol' gal now too and I figured that I would just post the progress in this thread!

Update - 10/10/09: I did a trade for some 17" wheels with one of the Z-boys and I am having those powder-coated white for this car - for after the 24v is up and running!
 

Attachments

#4 ·
Coppcarz- not to hijack this thread but my Milano has chromed Verde wheels, here's what it looks like:

Image


Image


Image


I also took the center caps out. I think they look better that way.

JJ- they look good! Do you have any more pictures of them in daylight?
 
#5 · (Edited)
Hey! The chromed Verdes look nice too - the brushed aluminium-look is a nice in-between though - me thinks... I like the "upgraded" look of the '95 wheels with it too...

Alfa continued the "phone-dial" theme, but with more of a "tear-drop" shape to the holes, rather than the Verde's (pretty-much) round holes. I have a set of European GTV/Spider wheels from the later years (somewhere ' 97 - '98) on Regina's LS and these now came as 16s, but they still have that basic phone-dial design, (except now the tear-drop holes have more rounded edges and came in a clear-coated metallic silver finish...)

Yeah Luis, you know what that red bar means... How's your Verde with the RSR kit - still enjoying it? Did you do the full RSR-thing? Adjustable rod-end watts linkages, DeDion bushing etc? I did the spherical bushing on the race-car, but we did the large poly-bush on the street car at the tip of the DeDion... Nice...

coppcarz, I had to have the machine shop down the street (Jon at Hansen Fabrication in Seattle - great guy!) - just barely touch the inside of each wheel-hub for me on the lathe, to fit the rear of the Verde hubs, but other than that, it goes right on... I mean it was like "nothing" that we had to remove - maybe 1mm.

So much for the whole hub-centric/lug-centric/wheel-centering rings conversation though... When you think about it - Alfa's own design of the OEM Milano/75 wheel fits the rear and the front... The smaller-hub wheel from a later model fits the front but not the rear of the Milano. That tells me that the rear hubs of the Milano centers are LARGER... We knew this already - fine. BUT, since you can rotate Milano wheels without any issue, this means that the OEM Milano/75 wheel rides tight in the rear, but loose on the front of a Milano WITHOUT the need for any hub centering rings...

Staring at the wheels on Joe's GTV sitting there - I see no center hub-supports like those on the Milano hub and there are not centering rings either - just tapered lugs that pull the wheel to the intended position...

The 17" TSWs that I run on my ' 95 LS - same story - a hole big enough to fit the Milano front AND rear and no hub centering rings to run them on the 164... Group 2 converted that car to wheel-studs for me and we just used a nice set of decent open wheel nuts and a good tapered shoulder on them - no vibration...
 
#6 ·
coppcarz said:
have the regular 88 verde rims, and was seriosuly considering having them chromed so they would lighten up the car a bit
Instead of having them chromed, I'd recommend getting them stripped and polished, then clear coated.

Chroming adds weight and makes the wheel more prone to cracking due to "hydrogen embrittlement". Verde wheels have problems staying round to begin with, I wouldn't want to make things worse.

Joe
 
#7 ·

Attachments

#8 · (Edited)
So, it's been a while (and a long time coming), but this ol' Italian *(insert: lady of the night)* is finally getting her day...! :D

Back in January when Ron Simons was still here visiting (and while on a routine errand down to the shop), some arse-clown made an illegal u-turn in-front of the SUV in-front of me :mad: with the end-result a pretty badly bent core-support (top "cross-member" that the hood latches into), a busted front bumper, headlight, grill and hood.

Other than that the old gal lived! It was time to yank the motor any way, perform some minor engine-bay rust repair and to get the whole car prepped and painted. We did a bunch of other rust repair around the usual spots such as the doors, the tail-lights, the sunroof etc. The engine was due for a rebuild and rather than going that route - well, you guys know me - if 12 valves are good, 24 valves are better...

We did some wire-wheel and rust-inhibitor work in the corners of the engine-bay, primered everything and painted the area in a flat-matte charcoal black engine-enamel! We removed the A/C condenser and canister, the non-ABS (converted some years back) brake booster and master (in favour of the Alfetta pedal box required for the conversion), as well as some other redundant A/C-related lines and so on.

I dropped the new 24 valve off there yesterday (stock 10.0:1 compression sub and heads with GTA Stage II cams, 44mm GTA/Q intake runners and GoTech Pro-X programmable stand-alone and harness.) The oil-filler neck is relocated, the intake plenum is fully-converted, the sump and oil-pump pick-up is done, Verde flywheel is ready to be bolted on and the injectors are cleaned and ready to go.

Can't wait! :p This car already has a fully-prepared transmission, full RSRacing suspension, Group 2/GiroDisc brakes, battery relocated to the trunk & tray removed and a host of other goodies installed on it! The 3.7 litre race car is fantastic, but I can't wait to have my street Milano back!
 

Attachments

#9 ·
I have a European 75/TS rear bumper already, but I am desperately looking for a front one or an Evo or other "smooth-side" front bumper for the car.

I will also be converting those castor rods to 105 ball-joints while we're in there...
 
#11 · (Edited)
Much better steering feel, no toe-out or camber change on braking (from the caster bushing flex anyways). Go take a look at yours, there's a very good chance the stock ones are completely dead. 105 joints are best, but poly bushings there work pretty well too. It's one of the cheapest/best mods you can do - no extra vibration, and the steering feel of an Alfa.

That engine bay looks so clean you could eat off it. I'd eat off it, but you'd probably kill me for eating in your engine bay! (Because it's so clean)

I still want to go visit you guys and see your wonderful tracks. Might be cheaper than a day at Laguna these days anyhow :(

How much is a typical day run at PIR anyhow? it's about $350 for Laguna.
 
#12 · (Edited)
Thanks, yeah - I kept staring at it yesterday. Can't wait to shoehorn the 24 valve in there!

$175 at Pacific Raceways includes a really nice box-lunch and LOTS of track-time!

Yeah, I have poly on both sides in there now (the red bushings can still be seen in the pictures.) I went poly about 5 years back when I first got the car (before I knew about the 105 conversion and since my old rubber was almost non-existent!) What was there looked like bubblegum on a Houston summer-sidewalk... :D

The pioly has worked great, but I still think that the ball-joints are the best money one can spend.
 
#13 ·
Looks great JJ - that car is so close now. A weekend of work and you could be driving it around town with the full monty: 24v, RSR, race-prepped box, Girodisc brakes :cool:

Grant, I can highly recommend Pacific Raceways and running with the NWARC club. The on-track rules etc. are very similar to ours at AROSC, except no timing (time trailing) and no race group. But, you'll have a blast. Regular seat belt is accepted (if I recall correctly), and no requirement for fire extinguisher. So, in terms of safety requirements it is probably more similar to HPDE.

Jes
 
#14 ·
Honestly Jes, that track looks amazing. Maybe once my career has started, I"ll have the money to make a week long trip up to make the drive worthwhile.
 
#15 · (Edited)
Making progress...

Starter on, tail-housing on, engine mounts on, motor in (for now - so that I can get a local version of some 24 valve transaxle conversion headers done for myself and a few other guys that are waiting...) I always get them from SA, but it is high time to have a local version!

It'll come back out to plug up the EGR holes on the rear of the heads (this is a ' 95 engine), to deal with the heater take-off, to change out the cam-angle sensor (to produce the additional signal that the GoTech needs to run this thing on full-sequential) and to put the last bolts in the tail-housing...

Don't ever swap the aluminium mounts from side to side and not tell your trusty helper - pain in the arse! :mad:
 

Attachments

#17 · (Edited)
Rusty Floors!

Uhhhh - sorry about that dude! :eek: :D

So, has anybody come up with a solution for Milano replacement floor-pans!?

My rear engine/tail-housing mounts are completely rusted through on the one side and the front jack-points are non-existent on the street car!
 
#18 · (Edited)
Progress at last!

Alternator mounted. P/S pump mounted. P/S lines sorted. OMP kill-switch and chassis-harness distribution-post re-installed. Starter wire, alternator charge-wire, alternator "exciter"-wire, starter-wire and the engine block-ground run! (It all still needs to be cleaned up and tucked away, but for now the goal is to just get it going and then sort it)!

Fuel pump relay, starter relay, ECU relay, grounds and power-posts - all reconnected! T-stat housing and hoses sorted (ready for the radiator)! 164 water take-off blocked off.

Mom says it's time for my bath... :D
 

Attachments

#19 · (Edited)
Oh yeah - starter and battery main-supply cables installed, Alfetta pedal box bolted-down, gas pedal re-installed. Fuel lines connected.

Here are some shots with the plenum on and the coil-pack cover mocked-up!

Yeah-yeah - I know; the belt needs an idler and then there will be more contact-surface for the belt around the crank-pulley! (We've run it like this before on one of the previous 24 valve conversions before and it worked just fine though, but I will change it later)! I'll come back later and shorten all of the wires, redo and solder all of the connectors and tuck it all away as well.

On Monday I still have to get underneath it one more time to re-install thedown-pipes and a temp. rig-up of the exhaust, tighten the lower engine-mount nuts, install the flywheel shield and the exhaust heat-shield and bleed the brakes! I also have to reinstall the radiator and hoses, add coolant, run the GoTech Pro-X stand-alone harness and then we can fire it up!
 

Attachments

#20 ·
Hey Nizam! These look familiar!? (I'll give you a clue - they used to be chrome)! Anybody know what make they are!?

Not the lightest wheels, but I sort of liked the design. They are 17s and were part of a trade that I did with one of the Z-boys last year, so here they are! I just did not like the chrome though! It wasn't flaking off anywhere, so I had them sand-blasted and powder-coated to go on this street track 24 valve project.

The car will remain black after re-spray and I thought that the white would look good with it. (A bear to keep clean perhaps, but that's OK).

They're 7s though, but with 215s they'll be great for this street car!
 

Attachments

#22 ·
Thanks - yeah - removing chrome is expensive, but since they weren't flanking or anything (just oxidized), I was able to get away with just lightly blasting them and then powder-coating over the base metal (I think that it is copper below the nickel surface, right)?

At the end of the day the total cost including acquisition, shipping, blasting and coating was likely the same as a new set of (lighter) Team Dynamics rims, but hey - this is a street/track car only after all (and I'm a big fan of using what I have)! :D

It made it affordable to "leg-in" to these over time - thanks Nizam! Nice to have something different from what is on the race car too!
 
#23 · (Edited)
So, I had a small wiring problem in the GoTech harness that was simply perplexing to me.

I had to get the car out of the shop where I was working on it and brought it home to keep screwing with it here this week! In the end the human spirit prevailed over machine and she fired up tonight! (Loud as all hell in the garage with only down-pipes hooked up right now)! The usual - Jes knows the drill - neighbors come running out, babies crying, dogs scattering, sirens... :eek:

I was running the base GoTech Standard MFI fuel and timing on the car when it was still a 12 valve 3.0, running coil-fire direct - spark distributed via the stock dizzy, but with GoTech controlling the spark-timing and the fuel though). Now however, I am running a GoTech Pro-X. I had to go with a single 3x2 coil brick for now, but I will swap back to the 164 COPs soon!

Both Don Beeson and I are basically running the same exact setups right now in terms of the stock blocks and heads, stock 10.0:1 compression, GTA Stage II cams, the 44mm GTA intake runners, expanded intake plenums, custom headers, Pro-X with the coil-bricks and Magnecor leads (still 6 individual coils inside, but batch-fired) and semi-sequential fuel...

The goal is for both of us to connect the cam-sensors at the rear of the right-bank exhaust cams soon, re-installing the 6 coil-packs and going full-sequential (just as soon as the boyz at GoTech back in SA get their crap together). :cool:
 
#24 ·
Loaded Don's map tonight from our last trip to the dyno together and she runs beautifully!

Now the temporary exhaust, bleed the breaks and clutch, put the dash back together, temporary hood, temporary bumpers and then off to the dyno and then paint!
 
#26 · (Edited)
Yeah, I'd say that fitting the ancillaries is the hardest part of the entire conversion!

The stupid Mopar/Motorcraft/SVT/SVO/Chip Foose-wannabe crowd have it quite good; all of that stuff is available to them over-night (and even over-the-counter at Schuck's etc.)! They come in beautifully-sorted, billet aluminium, laser-inscribed parts - ready to fit most any auxiliary component, with most any engine/gearbox/chassis combination! It's an insult to call it "custom" anymore...

In the world of custom-custom (for the guy putting a blown GM 3.8 in a 60s Volvo wagon or something), we - with our 24v conversions - actually have it quite good! Our starters are a direct bolt-on, as is the tail-housing and the motors sit right on the stock engine-mounts - all of that sorted! I have the program down on the intake plenum and valve cover-conversions and brake-booster/pedal-box/brake-master/clutch-master options now, so what's left is the alternator bracket (and the P/S pump bracket for street cars and the A/C bracket - for the pansies in the sunbelt...) :D

It's the placement of the ancillaries that is a problem, since the transaxle chassis does a pretty severe slope - inward at the bottom - upfront! Tight in there. None of the old 164 components with 164 brackets work. None of the old Milano components and brackets work either! I have seen a picture of one conversion that appeared to use the 164 P/S bracket with the Milano P/S pump in the same location as the 164, but now the hoses change! The Milano alternator seems to fit with the Milano alternator bracket - down-left, but it fails (as we have learned) and I know from the past that it makes placement of the P/S pump a tight fit on that side!

Invariably, the hydraulics are another issue to contend with. Even that isn't standard; the Verdes have a P/S pump cooler (and only SOME of them do - at that)! :mad: The wiring just takes time, but it is straight forward for your average "electrical-guy" in the know (and that's NOT me...) :eek:

The best way to approach this is in-car and to then decide what components you want, decide where you want them, look at the various pre-drilled and tapped mounting-holes in the block and heads and go to work. There are just SO many possible combinations of just alternator, alternator AND P/S, alternator and P/S AND A/C, then A/C - no P/S and then all of the different types of alternator units and P/S pumps and A/C units, that I have never invested in having nice CNC stuff produced for any of it! I am thinking about it now for my car though - based on what worked for me (no A/C and only P/S for the street car and no P/S OR A/C for the race car). I am also using a much smaller, but powerful alternator than the standard Milano unit that others likely won't use, so it remains a custom application - no matter how you slice it!

When Jonnie was still at G2, they did some custom welded-steel brackets for Jes on his 24v street car (before it was decommissioned). It wasn't perfect though (the rear of the P/S bracket needed shimming for example). Big Jon over at Hanson made a rough copy of that bracket for me now (but it still needs spacing to align it properly) and I made my own bracket for the alternator using a combination of the standard cast-iron sump bracket from the Milano and a "universal" alternator kit. I also made my own for the alternator on the race car from welded steel (with some help from one of the fab. guys at G2 - when I was building that car)!

Elaborate enough for ya!? ;) :D
 
#28 · (Edited)
Yeah, it takes time...

So - here is one of the wheels - sans a tire - mocked-up on the car (just to have a look-see)! :) It'll be nice with the fresh black paint and some white decals perhaps?

Also, some sound of the 24 valve - just goofin' around in the gay-rage! (Still needs more exhaust trimming - I just mocked up the old 12 valve exhaust a bit to cut down the noise)! Those Glenwood Motors GTA Stage II cams are snappy!


Attachments

#29 ·
Yes Johnny!! Matte Black Maddness!!

Johnny,

Would it be possible for you to either email me or post up in the DEMON Milano thread some full body shots of your Milano (with bumpers on)? I`d like to play around with a few body concepts and I just love that matte black on your ride. It's inspiring!!

BTW, that matte black paint (blending those horizontal body lines under the windows) looks SLICK Bro!!!:eek::eek: I'm tellin' ya, angular cars such as the Milano, DESERVE such a harsh color like that to visual jump. With the sound of your 3.7 (and with what I'm tempting you to adjust on the body...:rolleyes:) would really set it off!!

streetfame

__________________
Best Car Insurance | Auto Protection Today | FREE Trade-In Quote