Well, enough people have asked me about the car and/or what I'm doing to it so I might as well answer in one place... The story so far...
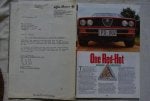
This car is my second Turbodelta, the first one having been a John French Turbodelta Alfetta GTV I owned in the early 90s.
Some years ago I saw Gulsons advertising a sedan, which was intriguing. I bought it sight unseen (I'm in Brisbane, car was in Canberra). Aparently it was fitted with the turodelta "kit" by Lorenso Montresor of Alfa Australia in 1982. It also had a bit of doco on when it was owned by Peter Dowling (well known Canberra alfa mechanic) which was encouraging. I drove it for a couple of years as a not-quite daily driver, but to be honest I was a bit disappointed with the car. It had a few non-autodelta bits and was a bit more tired than I had expected. Anyway, I decided to go ahead and try to freshen it up a bit mechanically, and to overcome one of the main problems with these cars - they don't like hot weather at all due to lack of an intercooler and the blow through carb setup.
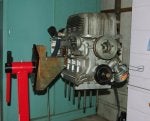
When the engine was pulled down it didn't seem too bad - liners were not worn, it was fitted with forged Arias low comp pistons, which was a nice surprise (had expected just the turbodelta kit). On the other hand it didn't have the turbodelta liners and cooper-rings. Another thing that discouraged messing with the liners etc was that the pistons were oversize - 86mm bore.
Anyway, had the head rebuilt and everything balanced, rebuilt the transaxle, fitted an intercooler. When I bought the car it already had a Garrett T3 turbo fitted rather than the original K26. However the turbo was in a bad way so I had it "rebuilt". In the hope of preventing it becoming so breathless at high revs and to improve efficiency as wall (in the hope of bringing down inlet temp more than anything) I had it rebuilt with a T04 .60 compressor while retaining the .48 A/R T3 turbine housing (actually, as it turned out this was cracked so ended up being replaced as well - bit of a grandfathers axe rebuild...). Not sure what any of you turbo gurus will think of that combo - but it seemed to work acceptably well. I don't have/can't remember compressor trim - I basically relied on the guys building it to know what they were doing...
To make the frontmount intercooler plumbing tidy I had the autodelta plenum modified to feed from the front rather than the side (the side feed having been being from a cross-pipe over the engine).
Also had a dizzy made up with vac advance/boost retard and a decent ignition module and coil as from previous experience with the GTV this helped a lot with driveability/responsiveness.
Anyway, put this lot back together and it ran ok - but chewed oil/produced smoke. It had gapless rings fitted and was running rich so hoped a decent tune might make it bed in - no such luck (went pretty well after the tune though!).
I put up with this for a while then pulled it down again. Found some probs with valve seals, also suspected the turbo oil return and tweaked that. Found a machine shop who were confident they could machine some used std liners to 86mm and had that done. Put it back together and it was worse. Drove it normally aspirated on a leaner tune for a while to try to get rings to bed in. No good. Sent it to someone who knew how to build an engine but was busy. Got busy with other projects myself (not car ones). Got rebuilt engine back, now with rods pistons modified for better oil scraping/return but basically - nothing terrible had been found. When I finally had the time to put it in and run it - guess what - it still burnt oil. At least this time the build had a warranty (1 supplier, and a good bloke) so back it went. The engine builder found the liners were not staying round and concluded 86mm and turbo was doomed. So went shopping for pistons and liners - this was a very slow process as there was no way I was going to do anything less than bomb proof after the hassles to date. Custom forged pistons were easy, but good liners not so easy. Eventually found a set of NOS turbodelta liners! But couldn't find cooper-rings to go with it. By this time the original engine builder had retired due to health probs and someone else was sorting out unfinished business like my engine. He was confident he could get the liners to work/get a gasket etc sorted. Waited a long time to get engine dumped on my doorstep while I was out. Put it in, felt really stiff - phoned engine builder - nah - should be fine - start her up. Did so and seized...
Pulled head and found pistons seemed to be wedged in bore, gouge marks at top of bore, pulled sump and found rods in backwards (offset rods on 2L nord).....
Also found solution to turbo liners had been to machine off the protrusion on the liners that retains the cooper ring. Was slightly surprised (and disappointed that there wasn't even a groove or o-ring used).
By this stage I didn't even want to look at the car so left it for a while...
Eventually had liners checked to see if they could be salvaged, rods and pistons checked too - rods and pistons ok but nobody confident that the liners could be cleaned up.
Spent a long time looking for liners, couldn't find any (I'm thinking there must be a market for some decent 2L liners if someone wants to get a reasonable batch made) so gave up and bough stock piston/liner set.. HAd the liners measured up to find out of roundness spec - which from past experience wasn't something I was prepared to risk so returned them. Despite earlier advice that the turbo liners were not recoverable got them cleaned up anywy and checked. They were ok! Got them o-ringed as well.
I just started putting the engine together before xmas (plan was to just refit pistons and liners - everything else should have been ok from prev rebuild - right?). Checked liner protrusion and found the liners are about 10 thou shorter than the block! Swore a bit. Decided if that was wrong anything/everything else could be so I'm going to give it back to a pro to check everything and reassemble (and come up with a fix for the short liner problem....).
Anyway that gives me time to do something about the body which over the years has become pretty sad - needs some rust (not much) removed and the paint is badly oxidised. I'm going to leave all that to the professionals beyond stripping parts off it. But if anyone in Brisbane has some rust free rear doors or some straight bumpers I'd be interested.... I've had a couple of suggestions for body shops but I'd be interested in other opinions. Not looking for (and can't afford) "show car" levels of finish - but need someone with a clue about these cars that can do a competent job of getting the rust out etc.
The car is going to be a fun car for the odd weekend of whatever (be it road or track) but won't be set up as a race car. I've contemplated to fitting a cage but it looks to be impossible to do anything compliant that doesn't make the car into a 2 seater, which rather destroys the point of the sedan... On the other hand, I'm reluctant do get too enthusiastic in this thing without one...
Anyhoo - enough words - the following posts will be a bit more pictorial...
This car is my second Turbodelta, the first one having been a John French Turbodelta Alfetta GTV I owned in the early 90s.
Some years ago I saw Gulsons advertising a sedan, which was intriguing. I bought it sight unseen (I'm in Brisbane, car was in Canberra). Aparently it was fitted with the turodelta "kit" by Lorenso Montresor of Alfa Australia in 1982. It also had a bit of doco on when it was owned by Peter Dowling (well known Canberra alfa mechanic) which was encouraging. I drove it for a couple of years as a not-quite daily driver, but to be honest I was a bit disappointed with the car. It had a few non-autodelta bits and was a bit more tired than I had expected. Anyway, I decided to go ahead and try to freshen it up a bit mechanically, and to overcome one of the main problems with these cars - they don't like hot weather at all due to lack of an intercooler and the blow through carb setup.
When the engine was pulled down it didn't seem too bad - liners were not worn, it was fitted with forged Arias low comp pistons, which was a nice surprise (had expected just the turbodelta kit). On the other hand it didn't have the turbodelta liners and cooper-rings. Another thing that discouraged messing with the liners etc was that the pistons were oversize - 86mm bore.
Anyway, had the head rebuilt and everything balanced, rebuilt the transaxle, fitted an intercooler. When I bought the car it already had a Garrett T3 turbo fitted rather than the original K26. However the turbo was in a bad way so I had it "rebuilt". In the hope of preventing it becoming so breathless at high revs and to improve efficiency as wall (in the hope of bringing down inlet temp more than anything) I had it rebuilt with a T04 .60 compressor while retaining the .48 A/R T3 turbine housing (actually, as it turned out this was cracked so ended up being replaced as well - bit of a grandfathers axe rebuild...). Not sure what any of you turbo gurus will think of that combo - but it seemed to work acceptably well. I don't have/can't remember compressor trim - I basically relied on the guys building it to know what they were doing...
To make the frontmount intercooler plumbing tidy I had the autodelta plenum modified to feed from the front rather than the side (the side feed having been being from a cross-pipe over the engine).
Also had a dizzy made up with vac advance/boost retard and a decent ignition module and coil as from previous experience with the GTV this helped a lot with driveability/responsiveness.
Anyway, put this lot back together and it ran ok - but chewed oil/produced smoke. It had gapless rings fitted and was running rich so hoped a decent tune might make it bed in - no such luck (went pretty well after the tune though!).
I put up with this for a while then pulled it down again. Found some probs with valve seals, also suspected the turbo oil return and tweaked that. Found a machine shop who were confident they could machine some used std liners to 86mm and had that done. Put it back together and it was worse. Drove it normally aspirated on a leaner tune for a while to try to get rings to bed in. No good. Sent it to someone who knew how to build an engine but was busy. Got busy with other projects myself (not car ones). Got rebuilt engine back, now with rods pistons modified for better oil scraping/return but basically - nothing terrible had been found. When I finally had the time to put it in and run it - guess what - it still burnt oil. At least this time the build had a warranty (1 supplier, and a good bloke) so back it went. The engine builder found the liners were not staying round and concluded 86mm and turbo was doomed. So went shopping for pistons and liners - this was a very slow process as there was no way I was going to do anything less than bomb proof after the hassles to date. Custom forged pistons were easy, but good liners not so easy. Eventually found a set of NOS turbodelta liners! But couldn't find cooper-rings to go with it. By this time the original engine builder had retired due to health probs and someone else was sorting out unfinished business like my engine. He was confident he could get the liners to work/get a gasket etc sorted. Waited a long time to get engine dumped on my doorstep while I was out. Put it in, felt really stiff - phoned engine builder - nah - should be fine - start her up. Did so and seized...
Pulled head and found pistons seemed to be wedged in bore, gouge marks at top of bore, pulled sump and found rods in backwards (offset rods on 2L nord).....
Also found solution to turbo liners had been to machine off the protrusion on the liners that retains the cooper ring. Was slightly surprised (and disappointed that there wasn't even a groove or o-ring used).
By this stage I didn't even want to look at the car so left it for a while...
Eventually had liners checked to see if they could be salvaged, rods and pistons checked too - rods and pistons ok but nobody confident that the liners could be cleaned up.
Spent a long time looking for liners, couldn't find any (I'm thinking there must be a market for some decent 2L liners if someone wants to get a reasonable batch made) so gave up and bough stock piston/liner set.. HAd the liners measured up to find out of roundness spec - which from past experience wasn't something I was prepared to risk so returned them. Despite earlier advice that the turbo liners were not recoverable got them cleaned up anywy and checked. They were ok! Got them o-ringed as well.
I just started putting the engine together before xmas (plan was to just refit pistons and liners - everything else should have been ok from prev rebuild - right?). Checked liner protrusion and found the liners are about 10 thou shorter than the block! Swore a bit. Decided if that was wrong anything/everything else could be so I'm going to give it back to a pro to check everything and reassemble (and come up with a fix for the short liner problem....).
Anyway that gives me time to do something about the body which over the years has become pretty sad - needs some rust (not much) removed and the paint is badly oxidised. I'm going to leave all that to the professionals beyond stripping parts off it. But if anyone in Brisbane has some rust free rear doors or some straight bumpers I'd be interested.... I've had a couple of suggestions for body shops but I'd be interested in other opinions. Not looking for (and can't afford) "show car" levels of finish - but need someone with a clue about these cars that can do a competent job of getting the rust out etc.
The car is going to be a fun car for the odd weekend of whatever (be it road or track) but won't be set up as a race car. I've contemplated to fitting a cage but it looks to be impossible to do anything compliant that doesn't make the car into a 2 seater, which rather destroys the point of the sedan... On the other hand, I'm reluctant do get too enthusiastic in this thing without one...
Anyhoo - enough words - the following posts will be a bit more pictorial...


")