Alfa Romeo Forums banner
21 - 40 of 42 Posts
Discussion starter · #21 ·
Misery Returns

Hood stuck shut again. Same drill, press and release on hood over latch mechanism while yanking on loose cable with plyers and hood eventually pops open. Cable is tight on latching mechanism, mechanism moves rotating barbed pin that enters hood. Any suggestions? Noticed small pin about 1/16" in dia. protruding into latch hole in hood. This supposed to be there? :confused:
 
IIRC, that pin is what actually gets engaged by the latch mechanism. (it's a sort of hairpin type affair)

When you pull the lever and actuate the release, it rotates the latch pin which in turn springs back that pin and releases the hood.

Any reason to believe your hood and latch alingment are off significantly or that the little screw in bumper thingies along the edges are set wrong?
 
Discussion starter · #23 ·
Hood Release

Hmmmm...should be in adjustment and no evidence of anything moving out of position. Went back to look again and noticed that there are 2 pins, or 1 hair pin shaped deal. With the hood proped open, the one toward the engine appears to be broken. The passanger side of that bottom pin was wedged down in the bottom of the circumfrence of the hole and the top one still extends fully across the hole. I'm thinking remove the bottom pin, or both broken halves, and leave the top one in place and be real careful lowering the hood. Suggestions? Thanks.
 
and dont forget gentlemen, the usefulness of a yearly lubricant bath of the mechanism to ease the cable in its job. (hood and trunk and levers)
 
I've said it before, but also lube the cables themselves as well as the mechanism. You can get a cable luber for $5 at your local motorcycle shop. Use it to inject a good spray lubricant along the cable (not WD40 - something thicker. TriFlow was recommended and has worked well for me).
 
Plan B installed today

Rainy and cool day here so I finally installed the back up cables for the trunk and hood. I used the following parts from Centerline:
Cable Hood--HC625
Cable Trunk--HC627

I also purchased 1/16" cable ferrules from True Value Hardware:
National part no. N283-846 or V3231 (both numbers were on the package).

You need a good pair of Klein wire cutters/crimpers to swage the ferrules. Use the area closest to the pivot on the cutters for swaging.

I'm installing these cables right along side the original ones to use in case they break at the release mechanism.
 

Attachments

Plan B (details of extra hood release)

I wrapped the cable around the release post and then swaged a loop in it. (Just like what Tifosi did.) You'll have to temporarily remove the mechanism to easily do this. Its only three bolts but make sure you mark the exact outline of it before removing it so you don't have to do any adjusting up/down/side to side like I did afterwards.

I ran the new one alongside the old one with zip ties. Note the "serpent" green ones I found. The other end goes over the brake master cylinder then disappears at the end of the orange rod that is shown in the photo. You can secure the end of it somewhere like what Tifosi did in the wheel well on his. I chose to let it hang as I didn't want to drill any extra holes in the car. To use this I have to get under the car and hold the end of cable sheath with vise grips and pull on the cable with another pair. If you choose to fix the end of the cable then all you have to do is pull on the cable.
 

Attachments

Plan B (details of extra trunk release)

First, you need to remove the gas/trunk release pillar cover, a couple of screws securing the rear drape, and the drain tube connection for the top.

Next get a flexable rod (orange reflective snow stick in this case) to fish the new one through from the pillar side. I shoved the rod in from the trunk, then taped the cable to end of it and pulled it through. You will need small hands to be able to get into the two holes behind the drape to do this. This is where I had to disconnect the drain hose.

I then secured the new one alongside the old one with my serpent green zip ties and then swaged a loop connecting it to the release mechanism. Note the duct tape to keep the cable from rubbing the paint. Again, I didn't have to drill any holes to make this work. I put a bolt through the lever end and tucked it in the cavity behind the pillar. I then reattached the drain tube and rear drape, then screwed the pillar cover back in place. If my trunk release fails, all I have to do is remove the pillar cover and hold the cable sheath end with vice grips and pull on the bolt.
 

Attachments

Smart move installing that.

For the hood release, I squeezed the backup cable through the firewall grommet alongside the original cable. Made a loop in the driver's footwell and zip-tied it in place.

Only tough part was that I had to feed about six feet of cable through before I could find it underneath the dash - pretty crowded up there with wires and whatnot.
 
Hood release

Smart move installing that.

For the hood release, I squeezed the backup cable through the firewall grommet alongside the original cable. Made a loop in the driver's footwell and zip-tied it in place.

Only tough part was that I had to feed about six feet of cable through before I could find it underneath the dash - pretty crowded up there with wires and whatnot.
Yes, I tried the grommet route but couldn't seem to make it fit through without contorting the grommet all to pieces so I went down in front of the brake components instead. Either way we are better off! I don't cringe everytime I release the hood or trunk now waiting for something to snap.
 
Been a productive weekend then, huh. :)

Interesting approach on the trunk release. Does/will the nut & bolt combination buzz on anything or just kinda tuck up the back of the release handle housing?
 
Thanks for these pictures. In the underhood picture, where is the emergency cable attached to the release itself? Thanks Again.


M'kay, here ya go.

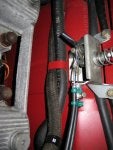
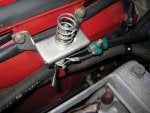
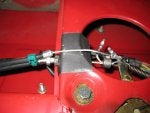
Under the hood the emergency cable sleeve runs parallel to and is zip tied to the regular release cable. Just a loop on the hood latch end to pull the release arm.

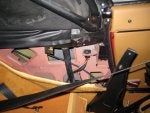
Under the fender (picture is taken kinda ground up looking into the upper back corner of the wheelwell) I came through with a cable adjuster as found on the same bicycle brake cable acting as a holder slash grommet, then the crimped loop and keyring.

The rubber flap was there already as part of the bodywork, so I just slip the keyring over it to stop it flopping around.

(and I'll be dealing with that rust around the clutch slave cylinder in a day or two, thanks :) )
 
Thanks a million. I am going to try and install on my cars ASAP.

I actually had the hood release cable break on my GTV. Fortunately it was at the lever under the dash and was not a big problem.

Dimitri


See if this does ya justice.

Rigged as described, about the only way the emergency cable can come off in the event of a main cable failure is if the cable lock bolt and the free end of the factory cable both shear off flush with the pivot pin, (ain't gonna happen IMO), and it just happens to lay in there nice and neat. :)
 
Not wanting to start a new thread, But I have just done this for the Bonnet on my 1972 Spider Veloce 2000 RHD.

Image


And the cable into the passenger foot well through the same grommet as the original release cable.


Yet to do the boot release.
 
21 - 40 of 42 Posts