Alfa Romeo Forums banner

windscreen removal and refitting

5.1K views 13 replies 5 participants last post by  BigSud  
#1 · (Edited)
question - is it normal to have to remove the dash to refit a windscreen to an alfasud seris 1 with the rubber mould type screen ?
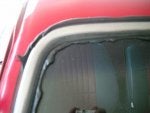
today i had the windscreen removed because of a leaky seal and am happy to find - NO RUST:D
but the fitter said i now have to remove the dashboard in order to get the rubber lip at he bottom to fit properly. he said othe cars like jaguar leave enough thread in the mounting screws to slide the dash back far enough to do the job
anybody got any advice on this, or has this just turned into a major job:rolleyes:
 
#3 ·
Aha! This has been a pain for my S1 over the past couple of years - courtesy of people who don't know to get out of the way when they're caught I've had to replace three screens.

And every time that bottom seal has been a pain - so thanks for that little tip. Of course it doesn't matter for me because the roll cage holds the dash in so I'm stuffed anyway...
 
#6 ·
got a problem
the original windscreen was clear glass but has a chip in it
and my good spare has a green tint in the glass
will that look alright?
and would it be better to go glue in rather than rubber mould as i have both sets of trims?
 
#7 ·
I doubt whether the green tint will be that noticeable once its on the car, if your wondering, put it in the rubber seal and sit it on the car, and step back and have a look, maybe wheel it outside to see it in the sun.

As for gluing it in place, I wouldn't. The glue has to be perfect, or else it can let water in. They stopped using the glue in method as they had trouble getting them to seal in the factory. The rubber seal should be fine I reckon, just get your guy to squeeze in some sealant between the rubber and the car to make its extra water tight.

Also if you go the glue in method, if your window has to come out for whatever reason, think of the remaining glue that you would have to remove from around the window on the car...
 
#8 ·
thats what i did, out in the sun and you really cant tell, until you look at the original one and get that classic chrome on clear glass effect.:(

but they dont make them in clear anymore, so we are all destined to have tinted windscreens sooner or later.:eek: and im not talking about the tinted band across the top, i mean the glass itself has a green tinge to it. i think that was standard in the seris 2 and 2.5. my seris 3 has a grey tinge

i reckon the glue in would be more water tight and stronger. i dont trust the rubber mould. especially with the chrome trim it makes it nearly impossible to inject a cauking compound once its fitted

but i had a look at the chrome trim for glue in screen today and its much wider and wouldnt look right anyway. check out the photo with the wider glue in trim sitting on the car.

.
 

Attachments

#9 ·
yeah your right, the wider trim isn't so nice. And your also right about the strength thing, the glass will be more structural if its glued.

From the photo the glass looks fine even though it has the green tinge, can hardly tell.

Is your green glass new or from a series 2 or after market? If after market what brand did u go for? I'll be looking for a new windscreen for my project soon, since all the front glass I have is either scratched or has small stone chips.
 
#10 · (Edited)
job finished
check out the cauking compound oozing out of the rubber
guaranteed not to leak!:rolleyes:

from what the windscreen fitter said
you can not tell the colour by the writing on the glass
that information has to do with govt standards etc

each company attaches a paper sticker to the screen when new
and that tells the information about make and model and colour etc

from what i have worked out the seris 1 suds 1975-79 and seris 2 79-80 had clear glass all round
seris 2.5 81-82 went to green tint
and seris 3 82 on (qv at least) had greyish tint
 

Attachments

#12 ·
Jon,

It's quite a simple job, but also somewhat nerve-wracking. The rubber piece that holds the sceen in does so by wrapping around the frame into the car. To get it out, you simply use a screwdriver to tuck the rubber lip back under the frame. If you do this evenly, all the way around the top and sides, the screen will come out easily - assuming that no silicone-type sealant was used.

To expand - find the piece of rubber at the top of the screen. Trace it all the way from the glass surface, across the rubber, to the point where the rubber ends at the rooflining. That rubber lip edge needs to be tucked back under the steel flanged edge of the the body.

I guess I could take a photo given that the car's nearby - but can anybody else describe this more eloquently to save some messing around?

The utmost safest way is to slice the rubber, and just lift the screen out - but I've never done it because I don't know where to buy new rubbers. They're probably like headlights - expensive and somewhere else.

Chris.
 
#14 ·
Sort of - you use a piece of string wrapped around the rubber, in the grove where the rubber sits in the steel, and use that to pull the lip back the other way, into the car. I painted my body around the screen (where it rusts) under the rubber with a high-build epoxy, and it's been very durable.

It needs to be quite strong string - but not sharp or you'll cut the rubber (which rules out piano wire) - and you need to pull it evenly around the screen, say from bottom middle (that's why the dash has to move) to top middle. Its useful to have a friend exert a little pressure (not too much - nervewracking) on the screen to help it pop into place.

Use non-drying sealant, not silicone, or you'll never get it out again.