Cloud storage filled up, and I stupidly deleted all my suspension reference photos.
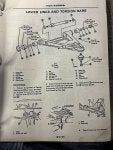
Would someone please verify the lower control arm/wishbone support arm assembly order?
Photo 1: my best guess.
Photo 2: verifying the scallop of the washer goes towards the reverse-scallop of the support bar. Makes sense.
Photo 3: the manual I have says the "protected side" of the bushing goes towards the support arm. I assume that means the hard plastic side towards the arm? When I took it off, that's how I remember it, but now I'm wondering if the other side, which is better encapsulated by the bushing's metal sleeve is... Well... Protected?
Photo 4: I did not have any foam piece during disassembly-- maybe some powdery crumbs remained. The crumbs were inside the capped and lock-nutted cavity of the lower control arm, around the M10x1.25 locking nut. Perhaps I should stuff this foam piece in there? I don't see a reference to the foam piece in the manuals. I did watch a video of a 105 series Alfa installing similar foam pieces around the hard plastic side of the bushing, against the scalloped washer. However, the scalloped washer OD is barely more than the foam piece's ID, so it'll definitely slide over and onto the bar during install?
![Image]()
![Image]()
![Image]()
![Image]()
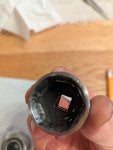
Oh, and if anyone is doing this job, this socket is a good fit. I used a die grinder to cut down the inside a bit, and I put it on my impact to spin it up and die grind a millimeter off the exterior. After, it's a perfect fit to force out the bushing with a pitman arm puller.
![Image]()
![Image]()
Would someone please verify the lower control arm/wishbone support arm assembly order?
Photo 1: my best guess.
Photo 2: verifying the scallop of the washer goes towards the reverse-scallop of the support bar. Makes sense.
Photo 3: the manual I have says the "protected side" of the bushing goes towards the support arm. I assume that means the hard plastic side towards the arm? When I took it off, that's how I remember it, but now I'm wondering if the other side, which is better encapsulated by the bushing's metal sleeve is... Well... Protected?
Photo 4: I did not have any foam piece during disassembly-- maybe some powdery crumbs remained. The crumbs were inside the capped and lock-nutted cavity of the lower control arm, around the M10x1.25 locking nut. Perhaps I should stuff this foam piece in there? I don't see a reference to the foam piece in the manuals. I did watch a video of a 105 series Alfa installing similar foam pieces around the hard plastic side of the bushing, against the scalloped washer. However, the scalloped washer OD is barely more than the foam piece's ID, so it'll definitely slide over and onto the bar during install?
Oh, and if anyone is doing this job, this socket is a good fit. I used a die grinder to cut down the inside a bit, and I put it on my impact to spin it up and die grind a millimeter off the exterior. After, it's a perfect fit to force out the bushing with a pitman arm puller.