It's been way too long since Brian sent me an extra set of rear calipers to explore and rebuild/restore but I'm happy to say, we finally found the time (and the o-rings) to get the job done right.
What follows will be as detailed a documentary as I can muster to help those dig into their calipers (or decide... maybe not). So, read on and hopefully this will help. Special thanks to Brian for being so patient. Brian, your calipers await you.
Getting started:
Here's what we got about a year ago:
![Image]()
![Image]()
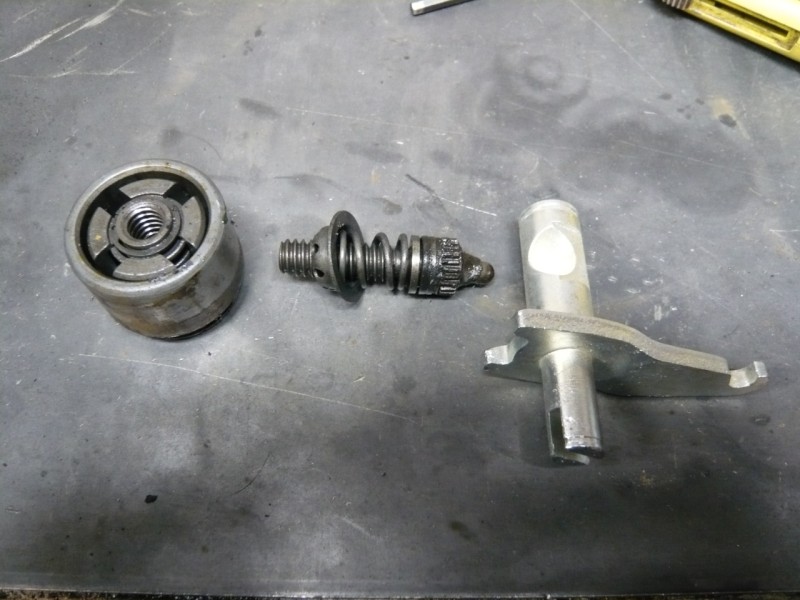
Let's start by removing that spring...
![Image]()
And the bleeders...
![Image]()
We had one bleeder that was really stuck. This usually doesn't happen but when it does I like to use a MAPP torch and ViseGrips. Heat the area around the base of the valve. This valve was also bent in shipping. Time for a new one.
![Image]()
Next it's the fasteners, the M7 (unobtainable fasteners to be precise). I like to power them out fast and easy with a airwrench. These have 11mm heads and seriously gang, they are basically unavailable so treat them with care.
![Image]()
Dental tools are a must here and I like to take a curved pick and get the dust seal clips off. Here's a classic shot of a torn dust seal. When this happens moisture gets in and goes right to the piston cavity. The upper area of the piston (above the bore seal) then gets mixed with brake fluid and rusty water and... they begin to gum up and stick. Yes, from this little hole I've just described the process on how your calipers go bye-bye so... it's important gang.
![Image]()
Yanking the old dust covers. Toss'em:
![Image]()
Next, take a 7mm (the same one you took the bleeders off with) and crank out the inner piston. It's pretty much that simple. Here's some tips; move the handbrake arm full motion before you do this. This breaks the bond any stuck piston may have. Once you've cranked it out as far as it can go use the arm again, this will push the adjuster mechanism against the piston and move it out another 1/8th"
![Image]()
![Image]()
What follows will be as detailed a documentary as I can muster to help those dig into their calipers (or decide... maybe not). So, read on and hopefully this will help. Special thanks to Brian for being so patient. Brian, your calipers await you.
Getting started:
Here's what we got about a year ago:


Let's start by removing that spring...

And the bleeders...

We had one bleeder that was really stuck. This usually doesn't happen but when it does I like to use a MAPP torch and ViseGrips. Heat the area around the base of the valve. This valve was also bent in shipping. Time for a new one.

Next it's the fasteners, the M7 (unobtainable fasteners to be precise). I like to power them out fast and easy with a airwrench. These have 11mm heads and seriously gang, they are basically unavailable so treat them with care.

Dental tools are a must here and I like to take a curved pick and get the dust seal clips off. Here's a classic shot of a torn dust seal. When this happens moisture gets in and goes right to the piston cavity. The upper area of the piston (above the bore seal) then gets mixed with brake fluid and rusty water and... they begin to gum up and stick. Yes, from this little hole I've just described the process on how your calipers go bye-bye so... it's important gang.

Yanking the old dust covers. Toss'em:

Next, take a 7mm (the same one you took the bleeders off with) and crank out the inner piston. It's pretty much that simple. Here's some tips; move the handbrake arm full motion before you do this. This breaks the bond any stuck piston may have. Once you've cranked it out as far as it can go use the arm again, this will push the adjuster mechanism against the piston and move it out another 1/8th"


 I like to use two to get this clip off. Here's the tip; one pick sits stationary on one end of the clip while you "flick" the other end of the clip with the other pick. Once the clip moves just engough STOP. Put your thumb over it and use the straight pick to get between it and the adjuster. Now finish the job. Best to do this with the projectile path facing your belly ("get in me belly"). If it flies it will bounce off your six-pack abs and hopefully be easier to find.