Hello All,
Although it might seem simple, there was a time that I did not know how to do this.
With the help of mcola, and this board, like every other job I have done on the car, I worked up the courage and went at it.
I thought I would post a simple procedure for replacing the pads.
If you are uncomfortable in any way, bring your car to any shop and they can replace the pads easily. In that case, this will help you get a better idea of the amount of work they are about to do and what they are about to charge.
If I have missed something or there is a better way, let me know and I will edit the thread.
As this is a brake related item, procede at own risk.
Good luck and let's start!
Vin
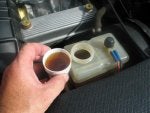
Using your best turkey baster, remove some oil from the brake resevoir. This will eliminate the possiblity of the resevoir overflowing later on in the precedure.
![]()
I removed enough that I felt would leave enough room in the resevoir.
![]()
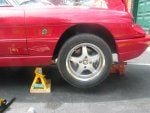
Place car on jackstands.
![]()
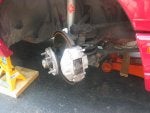
Remove tire and if working on the fronts, like in this picture, rotate the calipers to the outside to give you better working area.
![]()
Although it might seem simple, there was a time that I did not know how to do this.
With the help of mcola, and this board, like every other job I have done on the car, I worked up the courage and went at it.
I thought I would post a simple procedure for replacing the pads.
If you are uncomfortable in any way, bring your car to any shop and they can replace the pads easily. In that case, this will help you get a better idea of the amount of work they are about to do and what they are about to charge.
If I have missed something or there is a better way, let me know and I will edit the thread.
As this is a brake related item, procede at own risk.
Good luck and let's start!
Vin
Using your best turkey baster, remove some oil from the brake resevoir. This will eliminate the possiblity of the resevoir overflowing later on in the precedure.
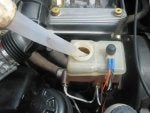
I removed enough that I felt would leave enough room in the resevoir.
Place car on jackstands.
Remove tire and if working on the fronts, like in this picture, rotate the calipers to the outside to give you better working area.