Hello friends!
Repairing an oil-into-water leak, I had to pull the liners out (although at the end I believe the problem was in the head gasket, but it was so much fun!). I followed the fantastic instrucions given in this post by DaveC (Thank you so much...)
http://www.alfabb.com/bb/forums/spider-1966-up/6036-oil-pan-removal.html
The only thing I missed here were some pictures, and that is the reason for writting this post. Hopefully they will help someone that follows the same procedure.
First of all, and with the only intention of putting together all the information, here is the explanation of the procedure given by DaveC (Thanks again!).
=================================================
You can do a ring job without opening the bottom of the engine. I've done it. Here is the procedure courtesy of the Alfa Digest...
Removing Pistons
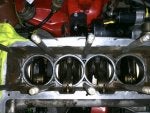
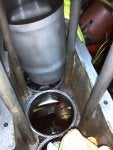
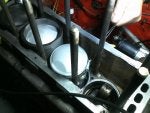
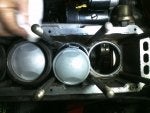
First, remove cylinder head. Now the object is to replace pistons and liners and not do the bottom end of the engine. Clamp a vice grip on the edge of a liner using an old copper exhaust manifold gasket folded over the liner edge so as to not chip or mar the inner surface. Rotate the engine, by hand, so the piston will come up against the jaw of the vice grip and raithe the liner out of the block. Do this to all liners. so that only the piston and rods looking looking at you. Two pistons will be up and two will be down. Put some rags in the liner holes in the block so as to not lose anything in the lower portion of the engine. Remove one of the circlips and push the piston pin out of the rod. Remove piston. Do this to all pistons.
Now the neat part.
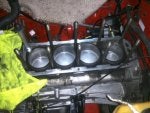
If you are replacing the piston and liners or just reconditioning the old ones (ring job) does not matter. First, place a piston in the bottom of a liner pressing the rings as they slide into the liner making sure ring gaps do not line up. Push the piston only far enough into the liner so the pin hole is still open. Put a circlip into the piston on the side closest to the block. (Remember, Arrow on top of piston points to exhast side of engine and orings are fitted on liner bottoms.) Start with number four piston assembly and rod at top of stroke. Lower piston assembly over rod and push home the pin. Insert circlip on the piston and push the liner down into the block. Obviously well oiled pieces make it easier. Install liner hold down on number four and rotate engine to bring #3 rod up so you can install the next assembly. Here is the trick part. Bring up Number two rod and install only the piston without the liner. Now bring up number one rod and install piston/liner assembly. Now to install the liner on Number two by loosly tightening a large hose clamp (I tied a piece of fishing wire to the clamp.) around the piston ring of number two. Lower the liner over number two carefully over the piston and pressing carefully so as to push the hose clamp down while the rings go into the bottom of the liner. Liners are camfered so it will easily accept the rings. Once the liner is over the ring take a long screwdriver and push the hose clamp down into the block. Twiddle the clamp so that the screw end can be unscrewed by the long screwdriver. Unscrew the clamp fully and pull the clamp out with the fishing line. Push the liner into the block. You are done.
I installed new piston and liners on my 87 Spider last year. This took me about two hours. One liner was a bit stuck and I used a large pipe and with piston at bottom of stroke I inserted the pipe into the liner and rocked the pipe a bit. This freed up the piston. Others came out easy.
If you are just doing a ring job, no need to remove pistons. just use the hose clamp method as a ring compressor.
Good luck
Dave
==================================================
Repairing an oil-into-water leak, I had to pull the liners out (although at the end I believe the problem was in the head gasket, but it was so much fun!). I followed the fantastic instrucions given in this post by DaveC (Thank you so much...)
http://www.alfabb.com/bb/forums/spider-1966-up/6036-oil-pan-removal.html
The only thing I missed here were some pictures, and that is the reason for writting this post. Hopefully they will help someone that follows the same procedure.
First of all, and with the only intention of putting together all the information, here is the explanation of the procedure given by DaveC (Thanks again!).
=================================================
You can do a ring job without opening the bottom of the engine. I've done it. Here is the procedure courtesy of the Alfa Digest...
Removing Pistons
First, remove cylinder head. Now the object is to replace pistons and liners and not do the bottom end of the engine. Clamp a vice grip on the edge of a liner using an old copper exhaust manifold gasket folded over the liner edge so as to not chip or mar the inner surface. Rotate the engine, by hand, so the piston will come up against the jaw of the vice grip and raithe the liner out of the block. Do this to all liners. so that only the piston and rods looking looking at you. Two pistons will be up and two will be down. Put some rags in the liner holes in the block so as to not lose anything in the lower portion of the engine. Remove one of the circlips and push the piston pin out of the rod. Remove piston. Do this to all pistons.
Now the neat part.
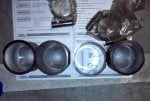
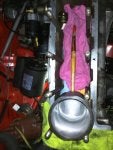
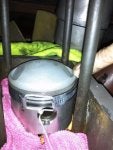
If you are replacing the piston and liners or just reconditioning the old ones (ring job) does not matter. First, place a piston in the bottom of a liner pressing the rings as they slide into the liner making sure ring gaps do not line up. Push the piston only far enough into the liner so the pin hole is still open. Put a circlip into the piston on the side closest to the block. (Remember, Arrow on top of piston points to exhast side of engine and orings are fitted on liner bottoms.) Start with number four piston assembly and rod at top of stroke. Lower piston assembly over rod and push home the pin. Insert circlip on the piston and push the liner down into the block. Obviously well oiled pieces make it easier. Install liner hold down on number four and rotate engine to bring #3 rod up so you can install the next assembly. Here is the trick part. Bring up Number two rod and install only the piston without the liner. Now bring up number one rod and install piston/liner assembly. Now to install the liner on Number two by loosly tightening a large hose clamp (I tied a piece of fishing wire to the clamp.) around the piston ring of number two. Lower the liner over number two carefully over the piston and pressing carefully so as to push the hose clamp down while the rings go into the bottom of the liner. Liners are camfered so it will easily accept the rings. Once the liner is over the ring take a long screwdriver and push the hose clamp down into the block. Twiddle the clamp so that the screw end can be unscrewed by the long screwdriver. Unscrew the clamp fully and pull the clamp out with the fishing line. Push the liner into the block. You are done.
I installed new piston and liners on my 87 Spider last year. This took me about two hours. One liner was a bit stuck and I used a large pipe and with piston at bottom of stroke I inserted the pipe into the liner and rocked the pipe a bit. This freed up the piston. Others came out easy.
If you are just doing a ring job, no need to remove pistons. just use the hose clamp method as a ring compressor.
Good luck
Dave
==================================================